React - JavaScript Library

React or react.js) is a free and open-source JavaScript library popular for building user interfaces based on components.Chakra UI and to manage the state of their application more efficiently, which can result in faster and more efficient rendering of the UI. (
Chakra UI is a comprehensive library of accessible, reusable, and composable React components that streamlines the development of modern web applications and websites.)
Next.js, which means that developers can render the UI on the server and send the HTML to the browser, improving the performance and SEO of the application.create-react-app is a development environment that helps to speed up the development process by letting developers focus on their code instead of configuring build tools. create-react-app includes built tools such as webpack, Babel, and ESLint. History of ReactJS:
Meta, who released an early prototype of React called "FaxJS".Meta (formerly Facebook) and was first released in May 29, 2013. React Native, which enables native Android, iOS, and UWP development with React, was announced at Facebook's React Conf in February 2015.open-sourced and made available to the wider developer community. This led to a rapid increase in popularity, as developers discovered the benefits of using React for building modern web applications.React 18 was released which introduced a new concurrent renderer, automatic batching and support for server side rendering with Suspense.Stack Overflow questions asked
Declarative & Imperative Programming
| Declarative Programming | Imperative Programming | |
|---|---|---|
| Approach | Defines what the output should be based on state and props | Defines how the output should be created step by step |
| Implementation | Typically uses React components and JSX to describe the UI | Typically uses imperative programming constructs like loops and conditionals to build the UI | Control Flow | Control flow is determined by React's rendering mechanism | Control flow is determined by the programmer's code | Ease of Development | Generally easier to read, reason about, and test | Can be more difficult to read and reason about | Efficiency | Generally more efficient because React can optimize updates to the UI | Can be less efficient because the programmer needs to manually manage updates to the UI | Examples | React component tree, JSX | DOM manipulation, jQuery |
Features of ReactJS
ReactJS is a powerful and flexible library for building user interfaces. Here are some of its key features:
ReactJS in MERN full stack
MERN (MongoDB, Express, React, Node.js) full stack development, which is a popular stack for building web applications. Here's how React fits into the MERN stack:
- 1. MongoDB: is a popular NoSQL database that can be used with Node.js. Developers can use MongoDB to store data for their web application.
- 2. Express: is a framework for building web applications with Node.js. Developers can use Express to create a server-side API for their web application.
- 3. React: is used to build the client-side of the web application. Developers can use React to create reusable UI components that can be composed together to create complex UIs.
- 4. Node.js: is a JavaScript runtime that allows developers to run JavaScript code on the server-side. Developers can use Node.js with Express to create a server-side API for their web application.
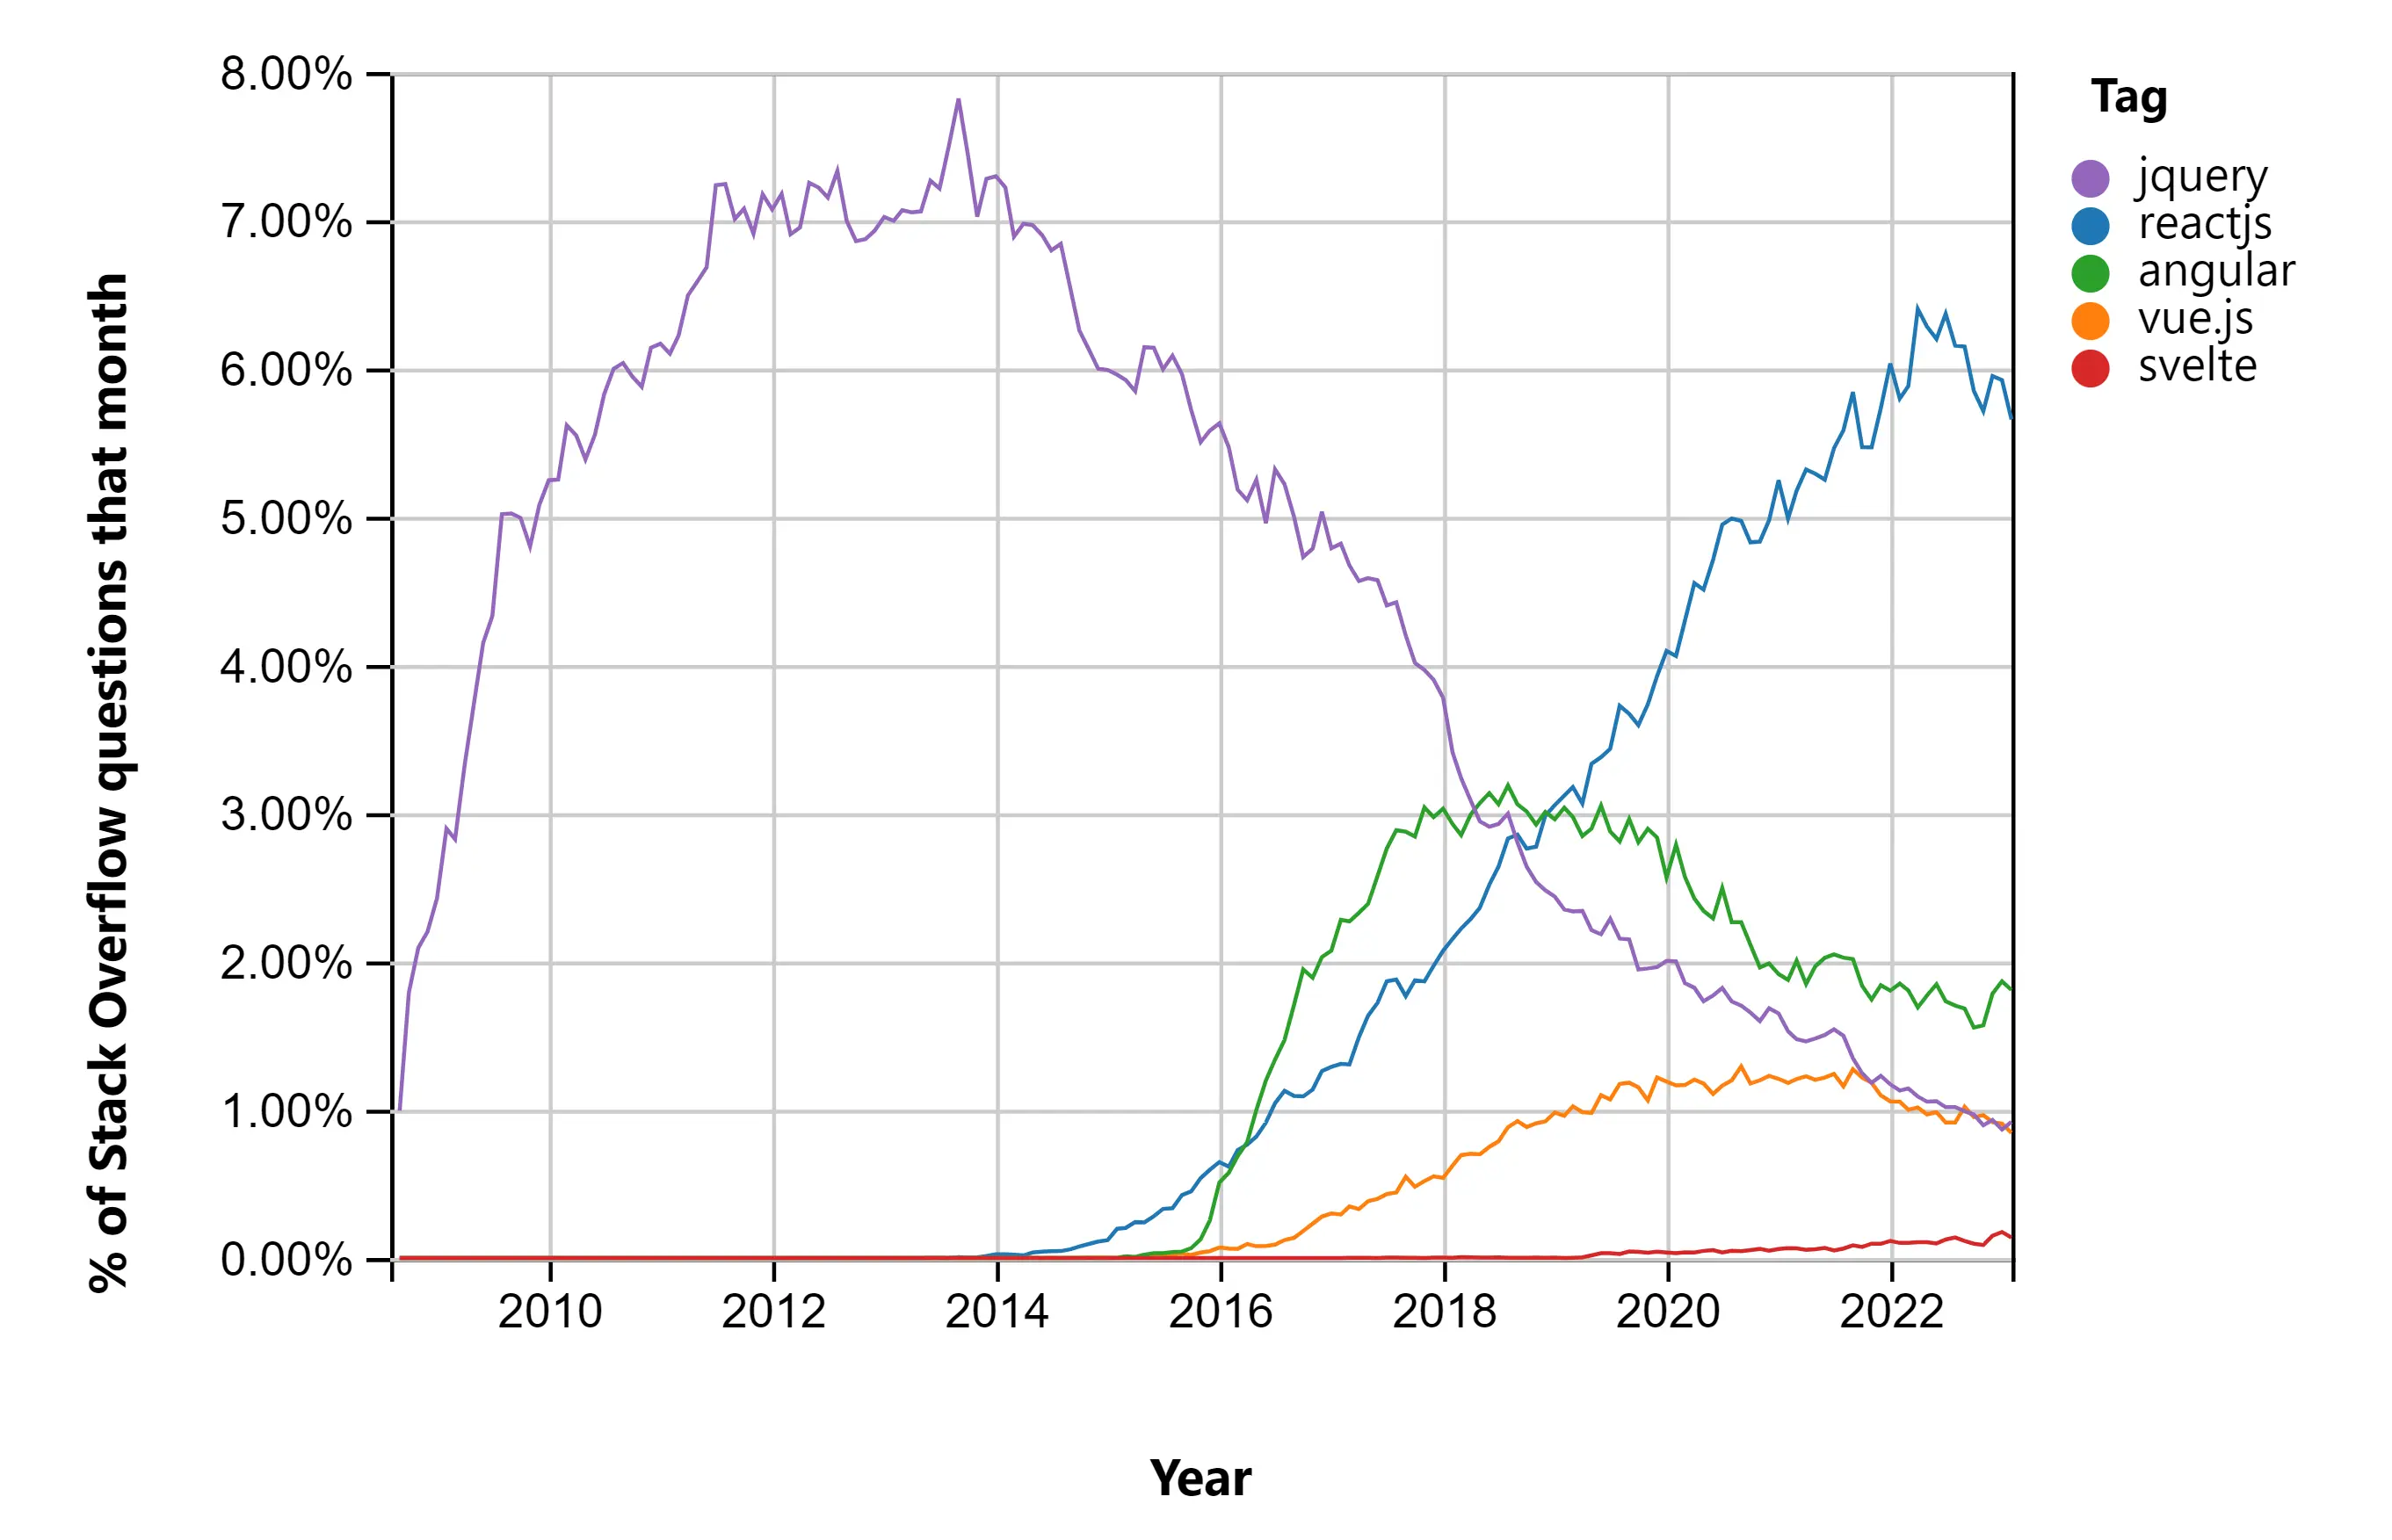
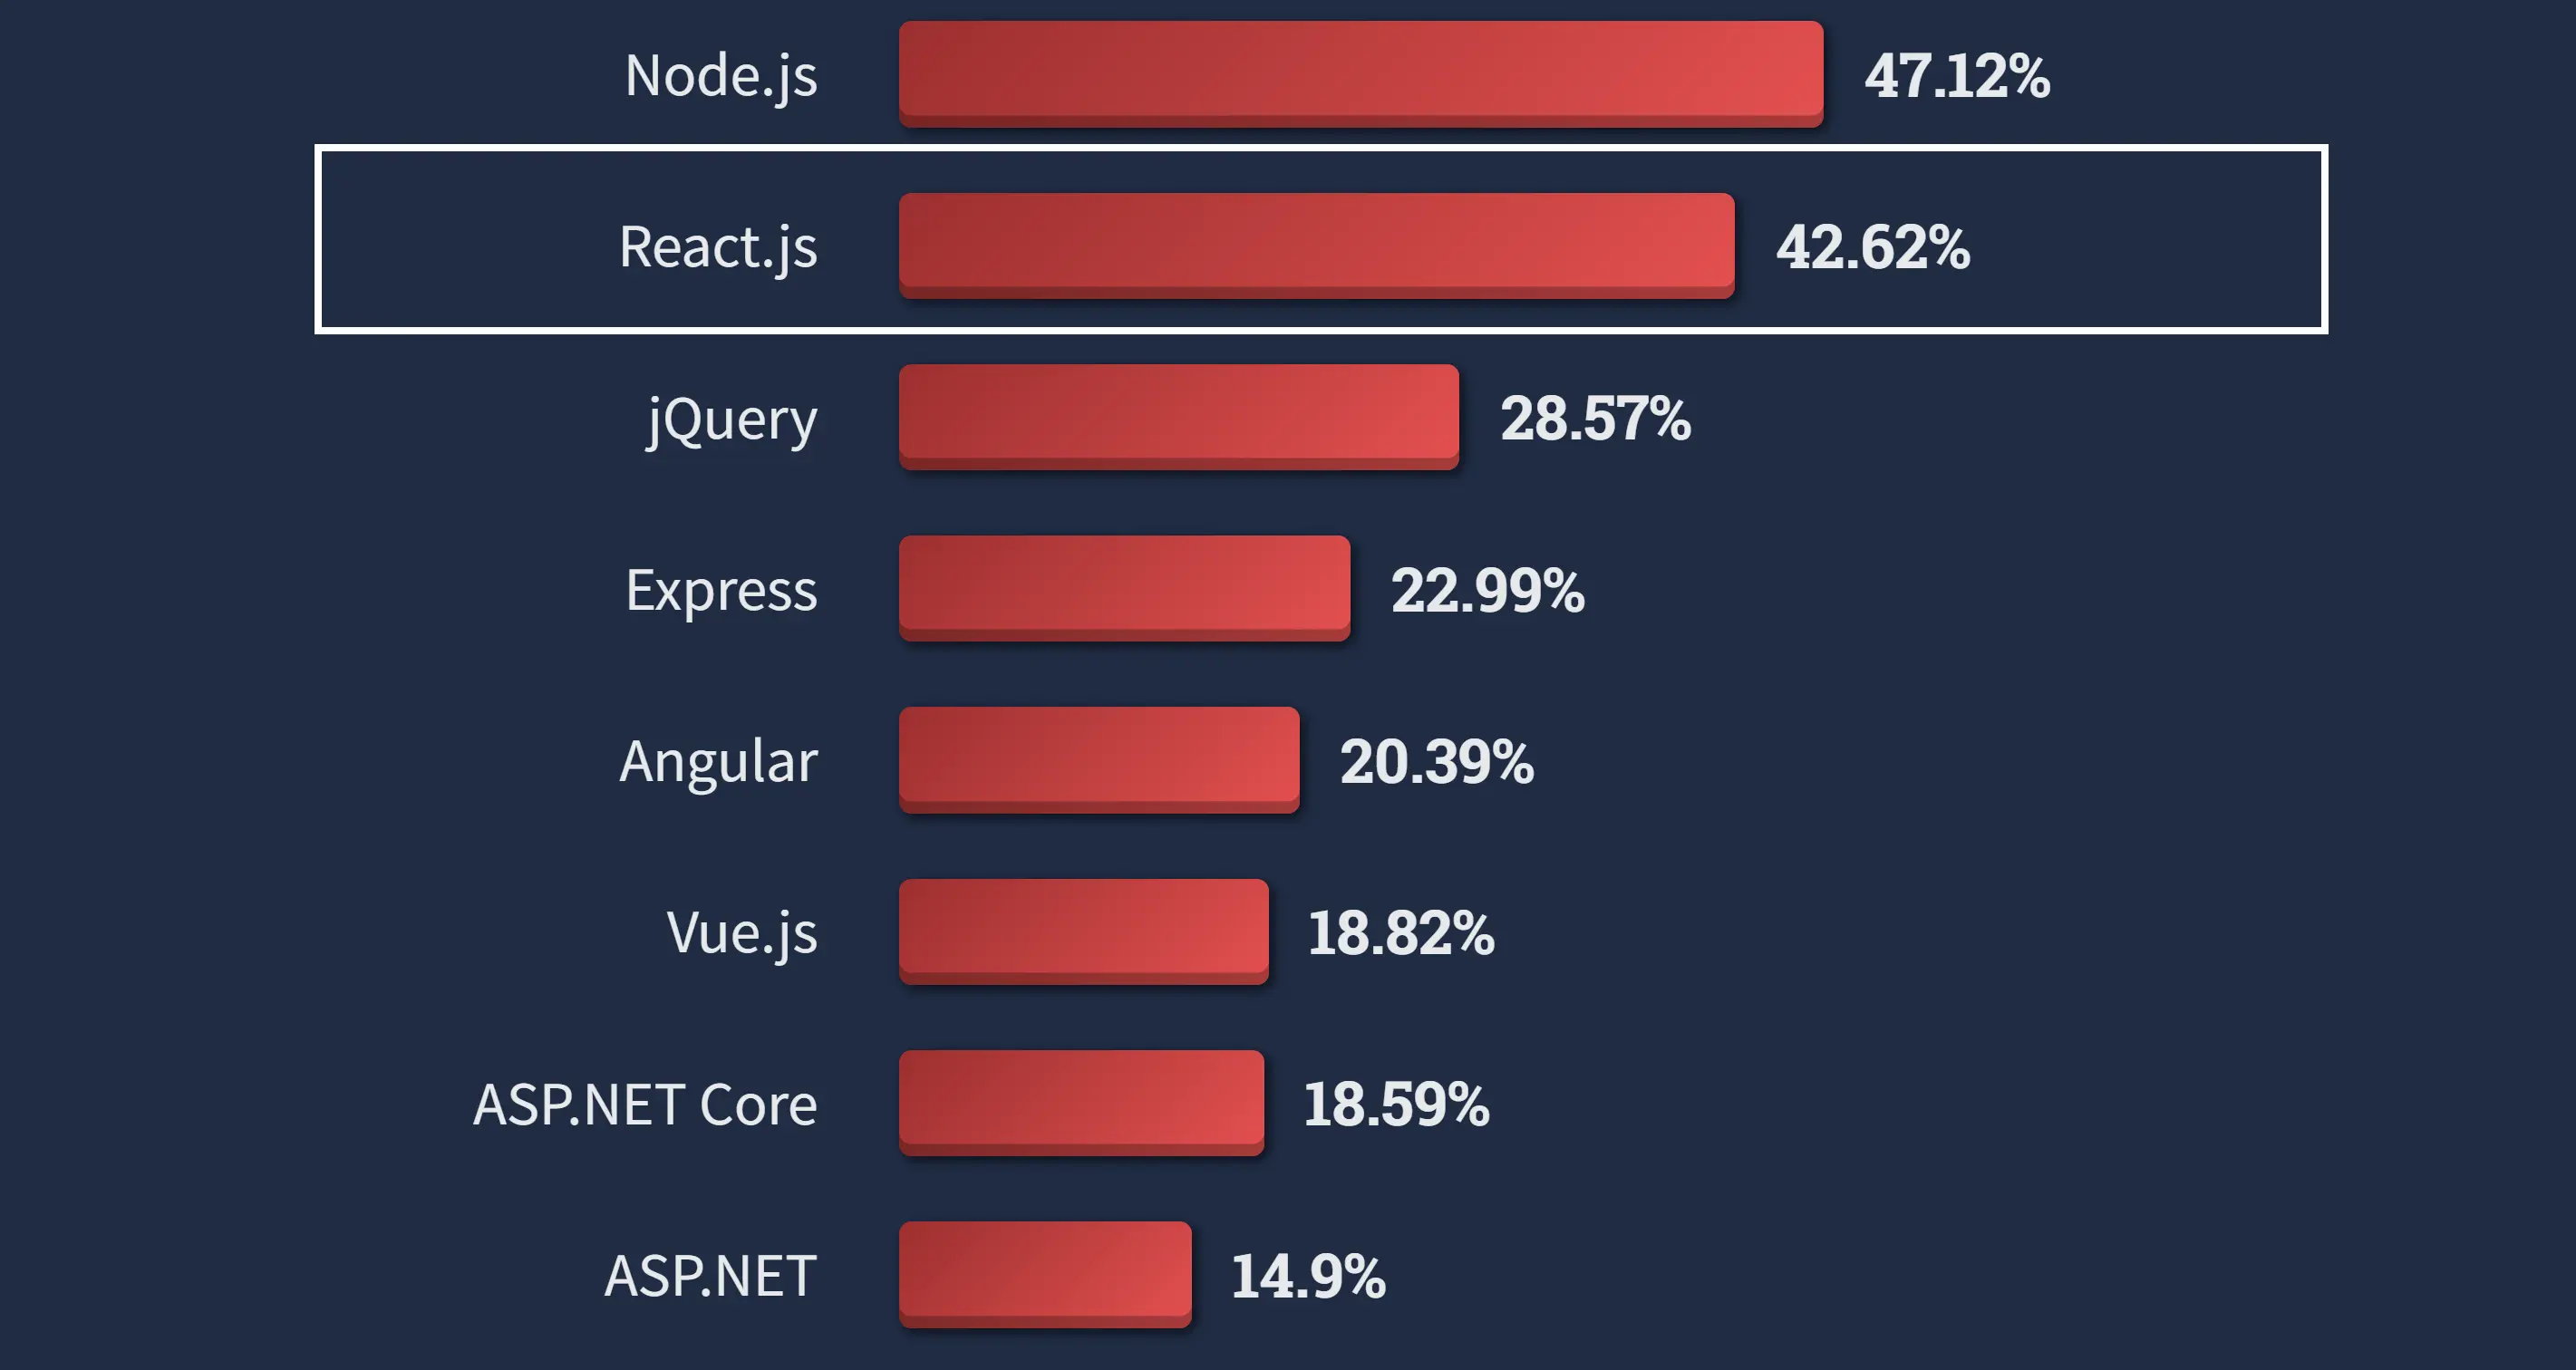
Stack Overflow Survey: Web Technologies popularity
42.62 % of Professional Developers and those learning to code with ReactJS, have done extensive development work in over the past year, and would want to work in over the next year as well.
Difference between React & Angular
It's worth noting that both ReactJS and Angular are powerful and widely used library/frameworks for building modern web applications, and the choice between them may depend on the specific needs and preferences of a given project or development team.
| Feature | ReactJS | Angular |
|---|---|---|
| Language | JavaScript | TypeScript |
| Architecture | Component-based | Component-based |
| State management | Flux or Redux | RxJS and NgRx |
| Templating | JSX or other templating libraries | Angular Templates |
| Learning curve | Easy to learn | Steep learning curve |
| Data binding | One-way data binding with props | Two-way data binding with ngModel |
| Size of library | Smaller library | Larger library |
| Community support | Large community support | Large community support |
| Performance | High performance with virtual DOM | High performance with change detection |
| Development environment | Can be used with any text editor or IDE | Requires the Angular CLI and specific IDEs |
| Mobile development | Can be used with React Native | Can be used with Ionic, NativeScript, or others |
| Testing tools | Jest, Enzyme, and others | Jasmine, Karma, and others |
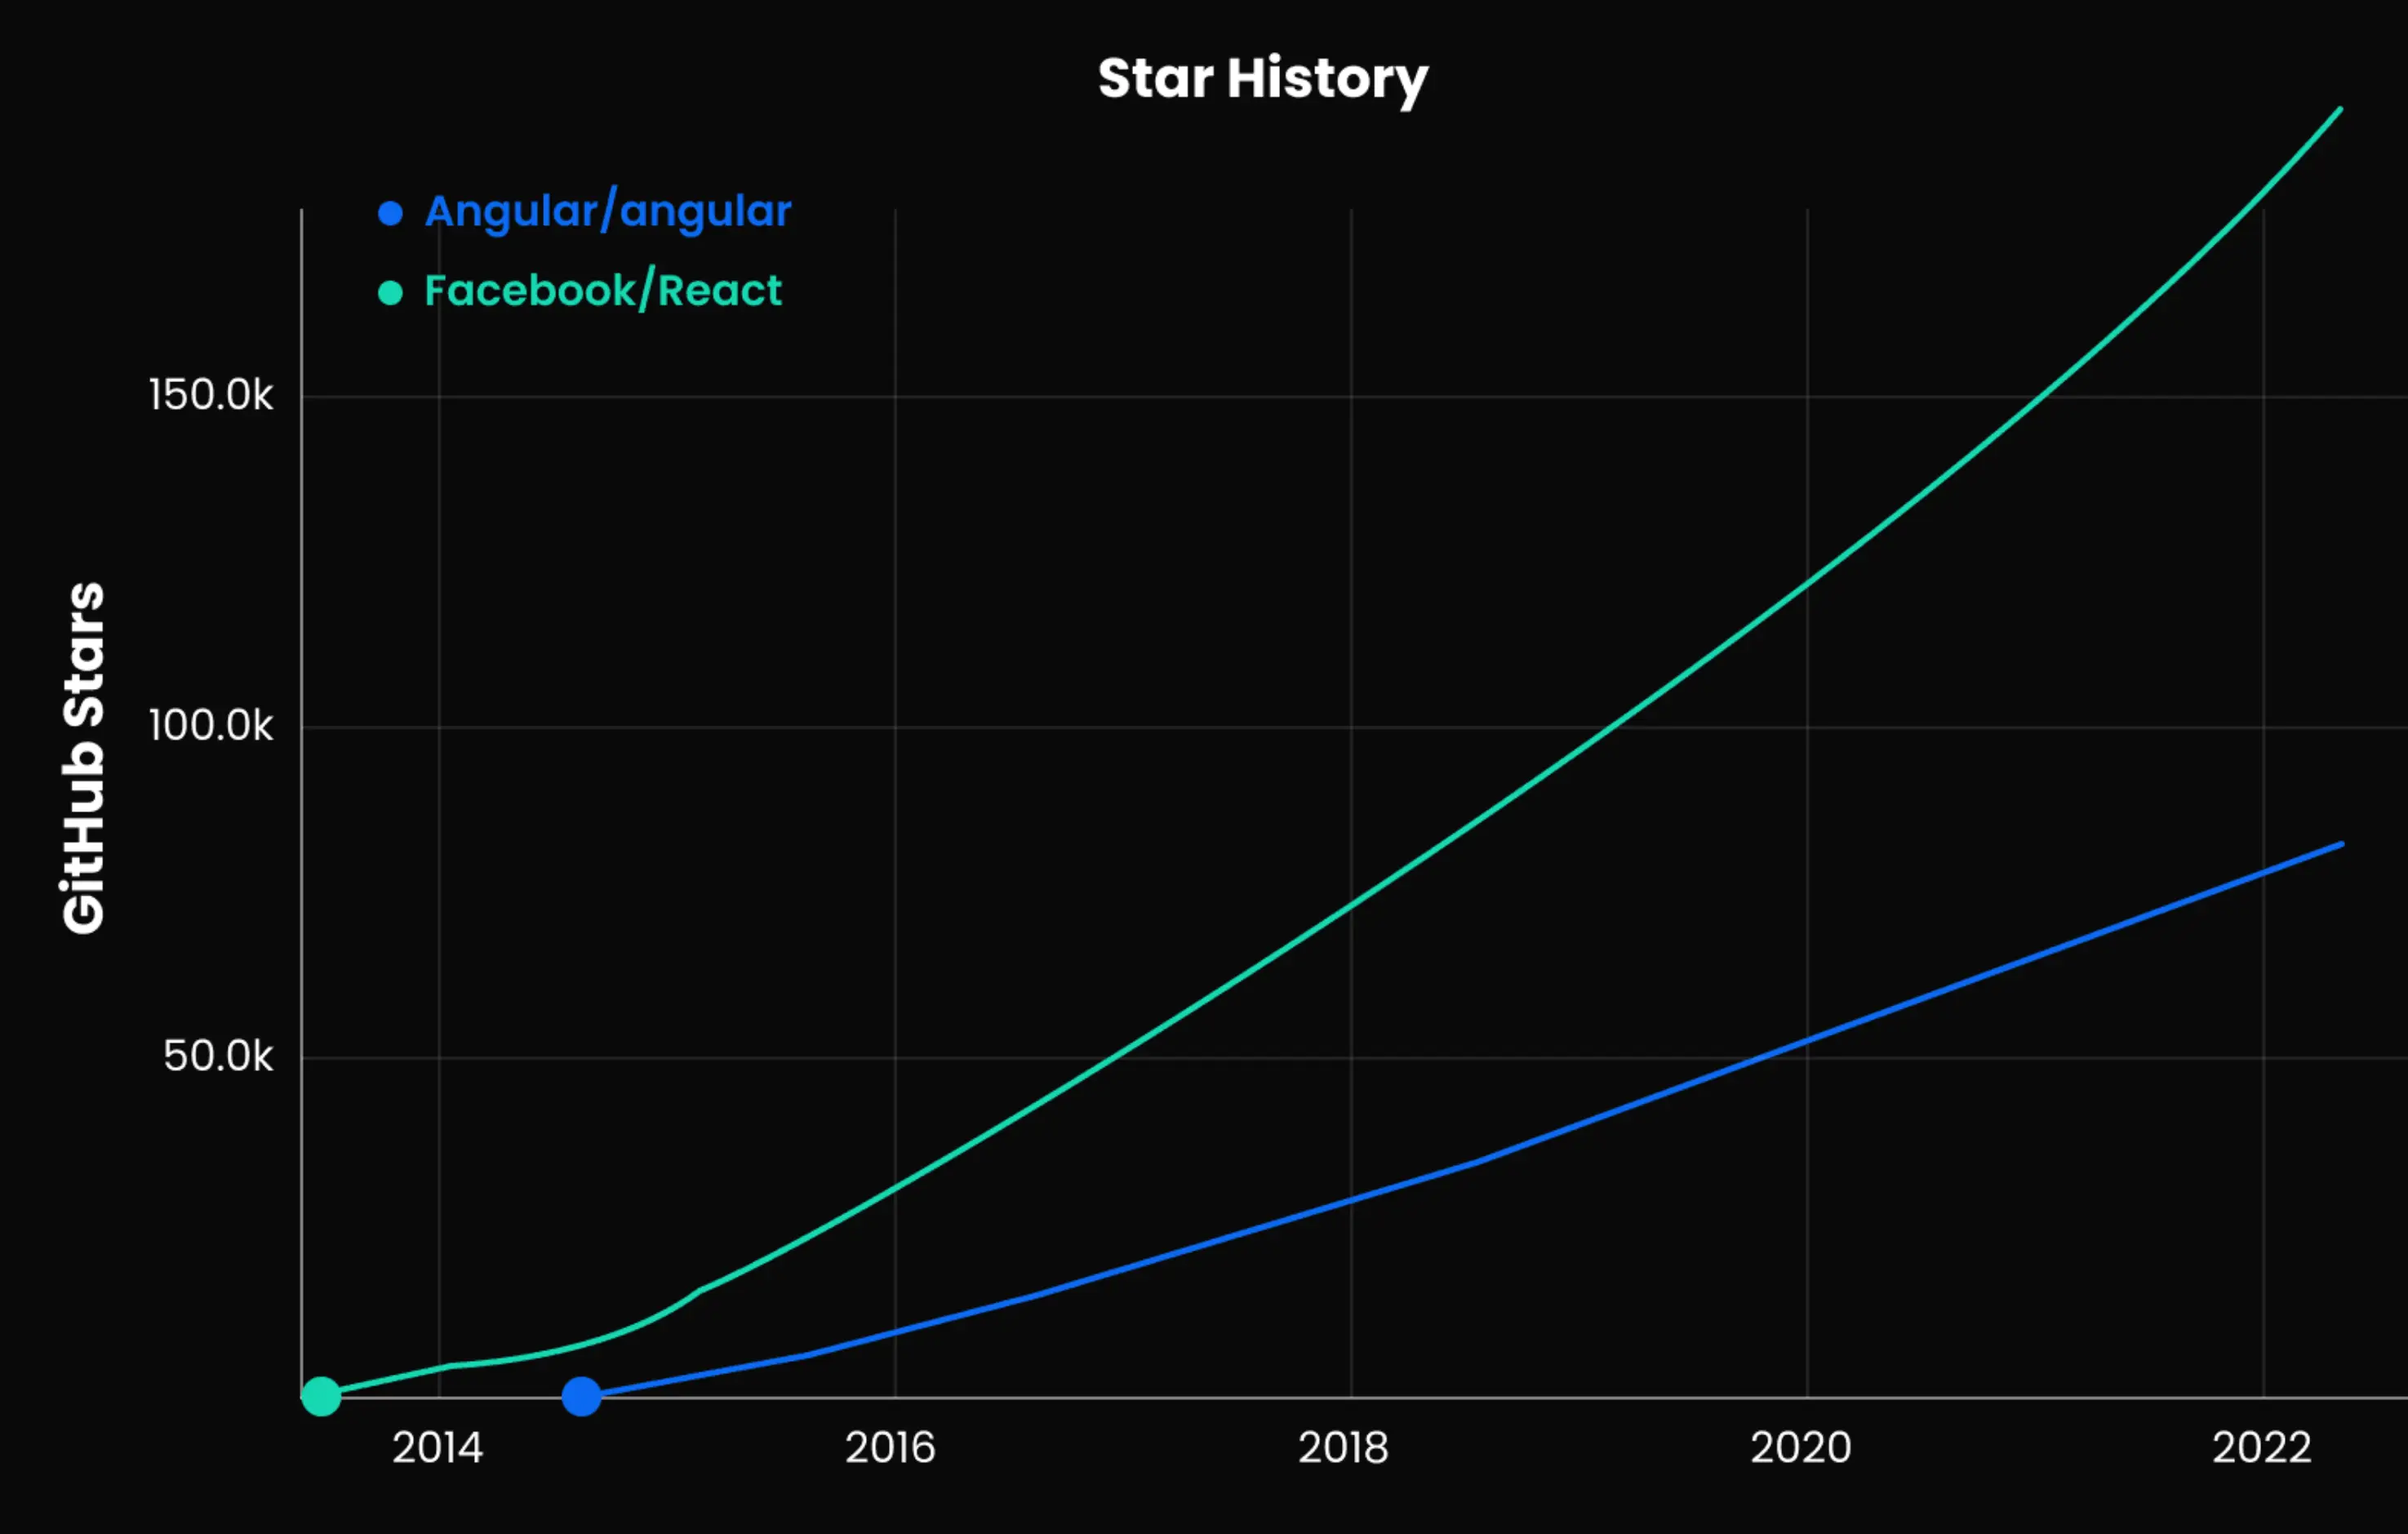
Comparision of Github stars
Comparision of Stack Overflow questions asked

How does ReactJS Work?
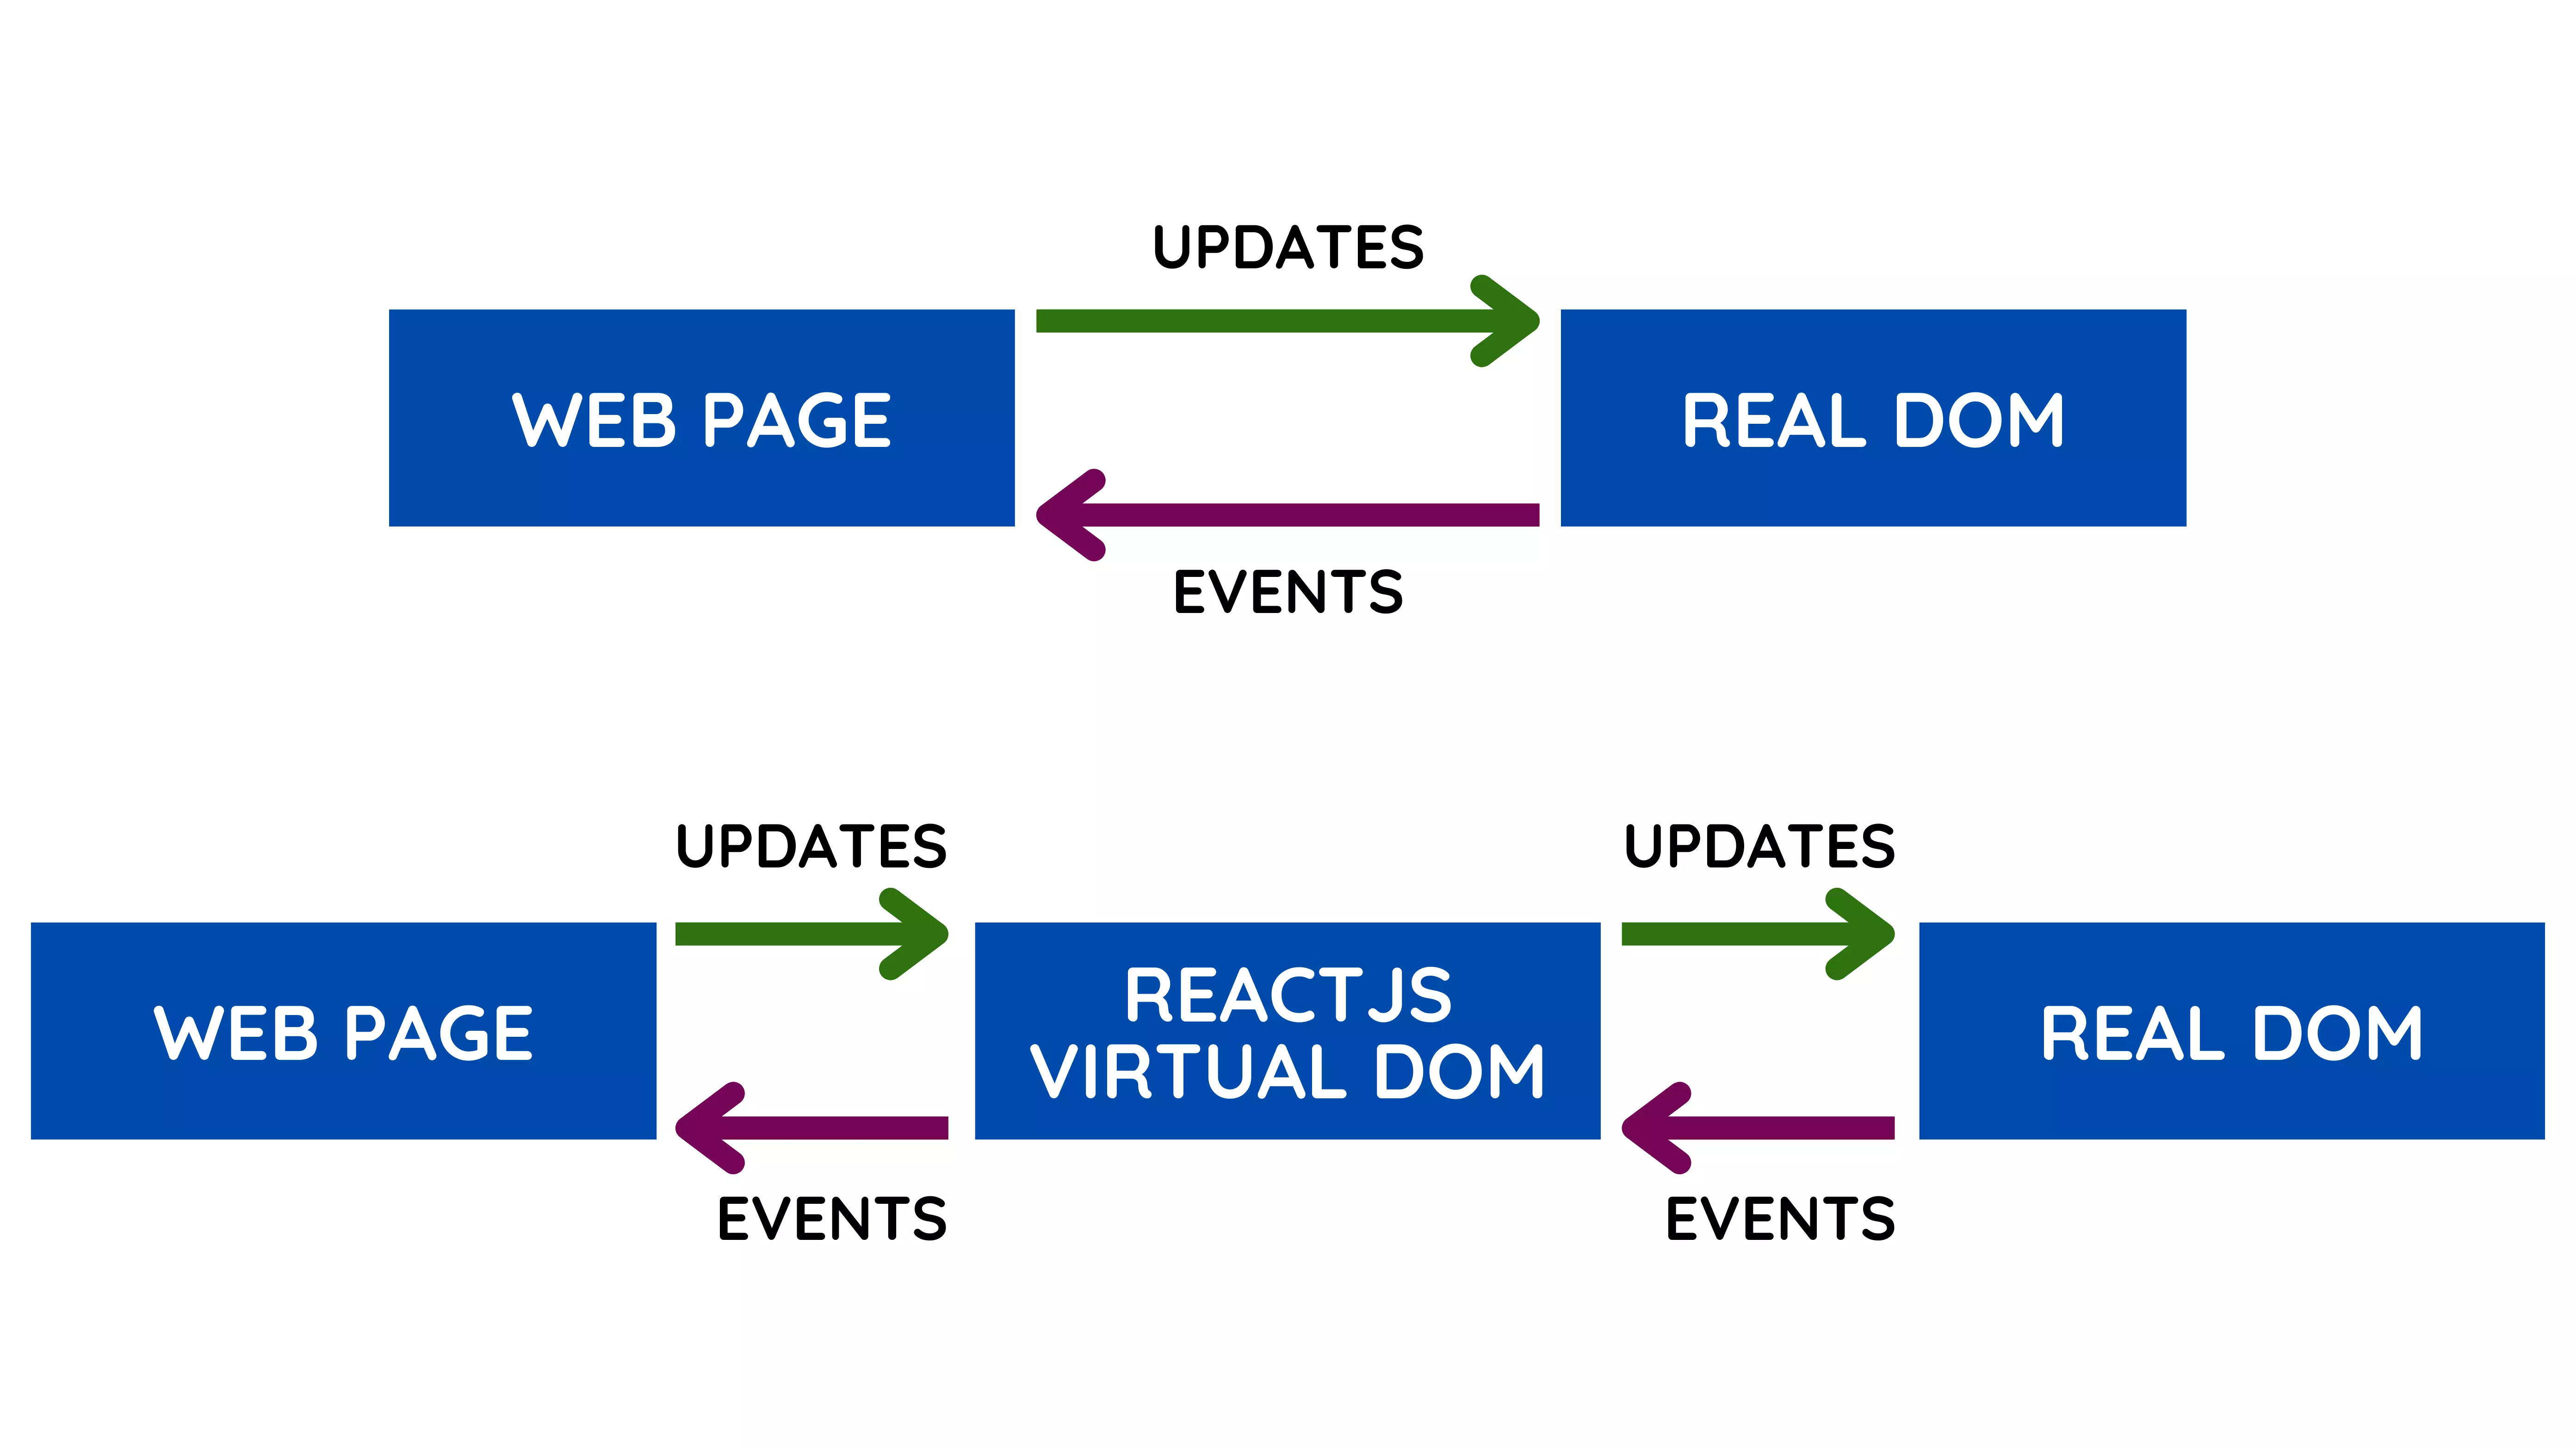
Virtual DOM & Real DOM
Before understanding how React works, let us see the comparision between Real DOM and Virtual DOM.
| Virtual DOM | Real DOM | |
|---|---|---|
| Definition | A lightweight & in-memory representation of the actual DOM | Actual HTML document rendered in the browser, as a tree structure wherein each node is an object represents a part of the document. |
| Creation | Created and maintained by ReactJS in memory | Created and managed by the browser |
| Updating | ReactJS updates the Virtual DOM when state or props change, and then efficiently applies only the necessary changes to the Real DOM | Changes to entire Real DOM are immediately reflected in the browser, which can be slow and inefficient |
| Performance | More efficient, because React can perform updates to the Virtual DOM without touching the Real DOM | Less efficient, because changes to the Real DOM can be slow and require a full page refresh |
| Manipulation | Can be manipulated directly using JavaScript, but changes will not be reflected in the browser until React updates the Real DOM | Can be manipulated directly using JavaScript, with changes immediately reflected in the browser |
| Code Sample | React.createElement(), setState(), render() |
document.createElement(), document.getElementById(), innerHTML |
Working of React
React is a JavaScript library for building user interfaces. React works by using a component-based architecture to build reusable UI components that are rendered to a virtual DOM. When a component's state or props change, React updates the virtual DOM and performs a diffing algorithm to identify the necessary changes to update the actual DOM efficiently. React uses a synthetic event system for event handling and allows state management through the setState() method.
Here are the basic steps involved in how React works:
- 1. Component rendering: React is based on a component-based architecture, which means that the user interface is built by assembling individual components. Each component is responsible for rendering a part of the user interface. When a component is first mounted, React calls its render() method, which returns a React element, a lightweight description of what to render.
- 2. Virtual DOM: Instead of updating the actual DOM directly, React uses a virtual DOM, an in-memory representation of the actual DOM. When a component's state or props change, React updates the virtual DOM by creating a new tree of React elements.
- 3. Reconciliation: React compares the new tree of React elements with the previous one and identifies the differences. This process is called reconciliation. Once React has identified the differences, it updates only the necessary parts of the actual DOM to reflect the changes.
- 4. Event handling: React uses a synthetic event system that wraps the native browser events and provides a consistent interface across different browsers. When an event occurs, React invokes the appropriate event handler that is defined in the component.
- 5. State management: React allows you to manage the state of a component using the setState() method. When a component's state changes, React re-renders the component and updates the virtual DOM. This triggers the reconciliation process and updates the actual DOM.
Overall, React works by creating a tree of reusable components, managing the component state and props, updating the virtual DOM, and efficiently updating the actual DOM to reflect the changes.
React Installation & Environment Setup
Run React locally
Consider the below mentioned standalone HTML file with React Component.
<!DOCTYPE html>
<html>
<head>
    <script src="https://unpkg.com/react@18/umd/react.development.js" crossorigin></script>
    <script src="https://unpkg.com/react-dom@18/umd/react-dom.development.js" crossorigin></script>
    <script src="https://unpkg.com/@babel/standalone/babel.min.js"></script>

    <title>ReactJS Standalone Example</title>
</head>
<body>
    <div id="root"></div>

    <script type="text/babel">

        function MyApp() {
            return (
                <>
                    <h1>SKILLZAM</h1>
                    <h2>Acquire, Authenticate, Announce your Skills!</h2>
                </>
            );
        }

        const container = document.getElementById('root');
        const root = ReactDOM.createRoot(container);
        root.render(<MyApp />);

    </script>

</body>
</html>
Step 1: Add a DOM Container to the HTML
<div> tag to mark the spot where you want to display something with React.<div> a unique id HTML attribute. This will allow us to find it from the JavaScript code later and display a React component inside of it.<div> like this anywhere inside the <body> tag. You may have as many independent DOM containers on one page as you need. They are usually empty — React will replace any existing content inside DOM containers.
<div id="root"></div>
Step 2: Add the Script Tags
<script> tags to the HTML file in the babel.min.js allows us to write code in JSX syntax.
<!-- Note: when deploying, replace "development.js" with "production.min.js". -->
<script src="https://unpkg.com/react@18/umd/react.development.js" crossorigin></script>
<script src="https://unpkg.com/react-dom@18/umd/react-dom.development.js" crossorigin></script>
<script src="https://unpkg.com/@babel/standalone/babel.min.js"></script>
Step 3: Add the Script Tag inside body tag
script tag contains the React component called Appreturn the JSX code with h1 and h2 tagsApp, will find the <div>, we added to the HTML in the first step, create a React app with it, and then display h1 & h2 React component inside of it.NOTE: Adding JSX to a project doesn't require complicated tools like a bundler or a development server. Essentially, adding JSX is a lot like adding a CSS preprocessor. The only requirement is to have Node.js installed on your computer.
function MyApp() {
  return (
      <>
          <h1>SKILLZAM</h1>
          <h2>Acquire, Authenticate, Announce your Skills!</h2>
      </>
  );
}

const container = document.getElementById('root');
const root = ReactDOM.createRoot(container);
root.render(<MyApp />);
Setup React Environment
1. Using Vite
Vite is a build tool that aims to provide a faster and leaner development experience for modern web projects. It consists of two major parts:
To create a project using Vite you first go into the folder where you host all your projects and then the follow the below mentioned steps :
- Step 1: Run npm
create vite@latest - Step 2: Choose a name for the project. That will also be the project's folder name.
- Step 3: Choose a framework. Pick “React”.
- Step 4: Select a variant : Pick JavaScript or TypeScript
- Step 5: Now go in the newly created project folder and Install the dependencies:
npm install - Step 6: To start the application:
npm run dev
C:\Users\Skillzam> npm create vite@latest
2. Using Next.js
Next.js is a full-stack React framework. It's versatile and lets you create React apps of any size—from a mostly static blog to a complex dynamic application. To create a new Next.js project, run in your terminal:
C:\Users\Skillzam> npx create-next-app
If you're new to Next.js, check out the Next.js tutorial
Next.js is maintained by Vercel. You can deploy a Next.js app to any Node.js or serverless hosting, or to your own server.
3. Using Remix
Remix is a full-stack React framework with nested routing. It lets you break your app into nested parts that can load data in parallel and refresh in response to the user actions. To create a new Remix project, run:
C:\Users\Skillzam> npx create-remix
If you're new to Remix, check out the Remix blog tutorial.
Remix is maintained by Shopify. You can deploy a Remix app to any Node.js or serverless hosting by using or writing an adapter.
4. Using Gatsby
Gatsby is a React framework for fast CMS-backed websites. Its rich plugin ecosystem and its GraphQL data layer simplify integrating content, APIs, and services into one website. To create a new Gatsby project, run:
C:\Users\Skillzam> npx create-gatsby
If you're new to Gatsby, check out the Gatsby tutorial.
Gatsby is maintained by Netlify. You can deploy a fully static Gatsby site to any static hosting. If you opt into using server-only features, make sure your hosting provider supports them for Gatsby.
5. Using create-react-app
Here's a step-by-step guide on how to install and set up the environment for ReactJS development on your computer using create-react-app.
Create React App is an officially supported way to create single-page React applications. It offers a modern build setup with no configuration.
- [a]. Install Node.js and npm: ReactJS requires Node.js and its package manager, npm. You can download and install them from the official Node.js website: Node Website Link
- [b]. Install create-react-app and create a new React project: create-react-app is a command-line tool that allows you to quickly create a new React project with a preconfigured setup. To install and create a new React project (my-reactapp ), open your terminal or command prompt and enter the following command:
C:\Users\Skillzam> npx create-react-app my-reactappReplace "my-reactapp" with the name of your app. This will create a new React project with the name "my-app" in the current directory.
- [c]. Start the development server: Navigate to your project directory by running the following command:
C:\Users\Skillzam> cd my-reactappThen start the development server by running the following command:
C:\Users\Skillzam\my-reactapp> npm startThis will start the development server and open your app in the browser at http://localhost:3000
Your browser will display something like this:
NOTE: If you've previously installed
create-react-appglobally vianpm install -g create-react-app, we recommend you uninstall the package usingnpm uninstall -g create-react-apporyarn global remove create-react-appto ensure thatnpxalways uses the latest version.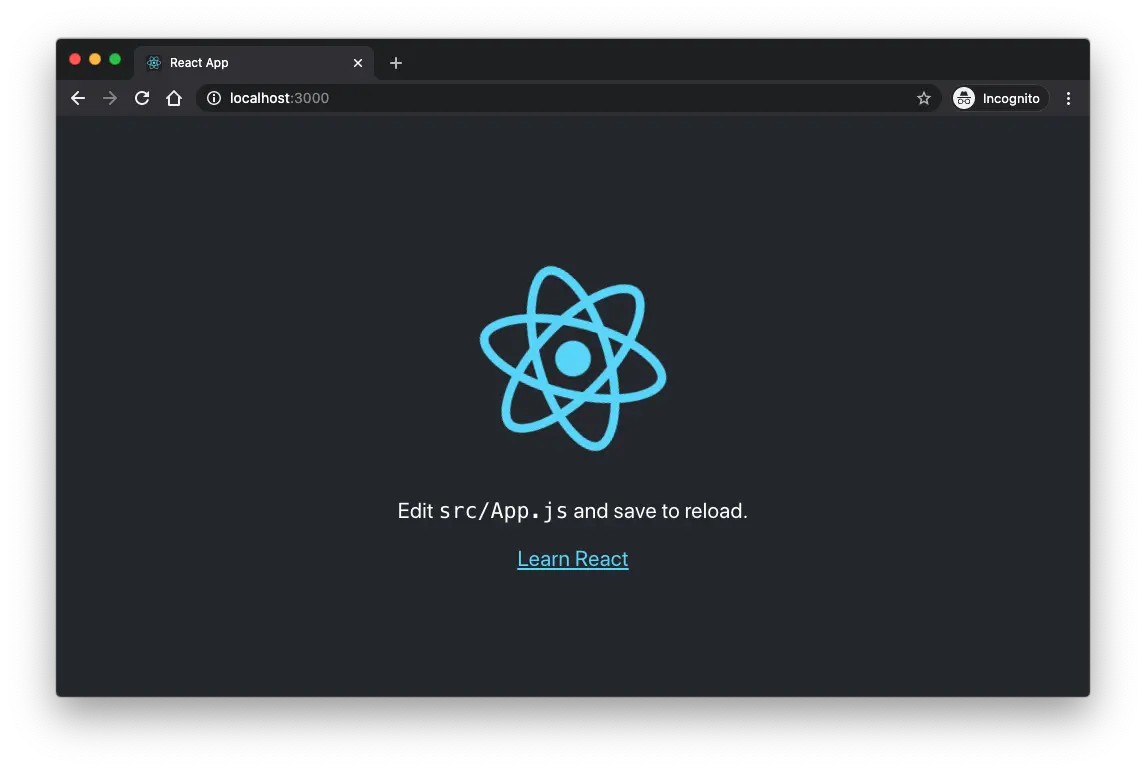
React Developer Tools
These Tools are used to inspect React components, edit props and state, and identify performance problems.
Browser extension
To debug websites built with React is to install the React Developer Tools browser extension:
Now, if you visit a website built with React, you will see the Components and Profiler panels.

create-react-app Application structure
create-react-app gives us everything we need to develop a React application. Its initial file structure looks like this:
      my-reactapp
      ├── README.md
      ├── node_modules
      ├── package.json
      ├── package-lock.json
      ├── .gitignore
      ├── public
      │   ├── favicon.ico
      │   ├── index.html
      │   ├── logo192.png
      │   ├── logo512.png
      │   ├── manifest.json
      │   └── robots.txt
      └── src
          ├── App.css
          ├── App.js
          ├── App.test.js
          ├── index.css
          ├── index.js
          ├── logo.svg
          ├── reportWebVitals.js
          └── setupTests.js
- favicon.ico (file): icon file that is used in index.html as favicon.
- index.html (file): It is the template file which is served up when we run start script to launch our app. Use this file and inject react components in root
divcontainer. - logo192.png & logo512.png (files): are react logo images
- manifest.json (file): to define app, mostly contains metadata.
- robots.txt (file): Defines rules for spiders, crawlers and scrapers for accessing your app.
- App.js (file): This file has very basic react component defined which can be replaced by our own root component
- App.test.js (file): A basic test(for default app) is defined in this file which can be replace by our own tests. [make use of Jest]
- index.css (file): Contains styles for general setup of our app.
- index.js (file): This files renders component and registers service workers(unregistered by default)
- logo.svg (file): Svg file of React logo, used in component (App.js)
- reportWebVitals (file): measure performance of React app by passing a function to log results. e.g.
reportWebVitals(console.log) - setupTests.js (file): This file setups tests & runs them. Directly invoked when tests run from cli (
npm run test).
Things to remember: File Structure of React Applications
- public/index.html is the page template
- src/index.js is the JavaScript entry point.
src. src are processed by webpack. Need to put any JS and CSS files inside src, otherwise webpack won't see.ReactJS "Hello World"
Step 1: Modify App.js file in src folder
src folder, there is a file called App.js. This contains React function component called "App"NOTE: Remove the import statements, & we do not need logo.svg and App.css
/* "App" component that displays a message */

function App() {
  return (
    <div className="App">
      <h1>Hello World!</h1>
    </div>
  );
}

export default App;
Step 2: Modify index.js file in src folder
src folder, there is a file called index.jsNOTE: Remove the other import statements, & we do not need index.css and reportWebVitals
/* React is rendered to a root element in the HTML page */

import React from 'react';
import ReactDOM from 'react-dom/client';
import App from './App';

const root = ReactDOM.createRoot(document.getElementById('root'));
root.render(
  <React.StrictMode>
    <App />
  </React.StrictMode>
);

Introduction to JSX
JSX stands for JavaScript Syntax Extension and occasionally referred as JavaScript XML, is an extension to the JavaScript language syntax, which provides a way to structure component rendering using syntax familiar to many developers commonly used in React. It is similar in appearance to HTML.
JSX lets you write HTML-like markup inside a JavaScript file. Although there are other ways to write components, most React developers prefer the conciseness of JSX, and most codebases use it.
createElement() and/or appendChild() methodsWhy JSX?
Features of JSX
- 1. Write HTML on multiple lines, put the HTML inside parentheses.
- 2. HTML code must be wrapped in one top level element, else JSX will throw an error, if the HTML is not correct, or if the HTML misses a parent element.
- 3. Use a "fragment" to wrap multiple lines. A fragment looks like an empty HTML tag:
<></> - 4. Use of curly braces
{ }
- JSX uses urly braces
{ }to write expressions - Valid things you can have in a JSX Expression:
- A string like "skillzam"
- A number like 99
- An array like [11, 22, 33, 44]
- Object property that will evaluate to some value
- Function call that returns value which may be JSX
map()method that always returns a new array- JSX itself
- JSX uses urly braces
- 5. JSX will throw an error, if the HTML is NOT properly closed. Either use
<App>...</App>or<App/> - 6. Since
classkeyword is a reserved word in JavaScript, you are not allowed to use it in JSX. Hence useClassName - 7. React supports
ifstatements, but NOT inside JSX :- put the
ifstatements outside of the JSX or - use a ternary expression instead
- put the
- 8. JSX prevents injection attacks, as it is safe to embed user input in JSX.
By default, React DOM escapes any values embedded in JSX before rendering them. Thus it ensures that you can never inject anything that's not explicitly written in your application.
Everything is converted to a string before being rendered. This helps prevent XSS (cross-site-scripting) attacks.
- 9. JSX represents Objects
Babel compiles JSX down to
React.createElement()calls.NOTE: Babel is a JavaScript compiler and transpiler that can transform modern JavaScript code into backward-compatible versions. JSX is not natively supported by browsers, so Babel is commonly used to transpile JSX code into plain JavaScript that browsers can understand.
Transpiling is the process of taking source code written in one language and transforming it into another language that has a similar level of abstraction
In the JSX Example below, the return statement contains the HTML code wrapped inside parentheses:
const Menu = () => {
  return (
    <div>
      <p>Services</p>
      <p>Industry</p>
      <p>About</p>
      <p>Contact</p>
    </div>
  );
}
In the JSX Example above, the <div> element is the top level element that wraps the all the HTML code.
In the JSX Example below, the fragments <> and </> wrap multiple lines:
function App() {
  return (
    <>
      <ul>Shopping List:
        <li>Tea</li>
        <li>Coffee</li>
        <li>Sugar</li>
        <li>Milk</li>
      </ul>
    </>
  );
}
In the JSX expression Example below, is used to find the area of a circle ; given the radius
 let radius = 12;
 const circleArea = <h1>Area = {3.142 * radius * radius} sq units</h1>;
In the JSX Example below, ClassName attribute is assigned the value "App"
function App() {
  return (
    <div className="App">
      <h1>Hello World!</h1>
    </div>
  );
}

export default App;
In the JSX Example below, with if statements outside of the JSX:
/* JavaScript statements */
let age = 24,
    message;

if (age < 19) {
    message = "NOT eligible to vote!";
}
else {
    message = "Eligible to vote!";
}

/* JSX statement */
const heading = <h1>{message}</h1>;
In the JSX Example below, using a ternary expression instead of if statements :
/* Ternary expression in JSX code */

let age = 24;
const heading = (
  <h1>{age < 19 ? "NOT eligible to vote!" : "Eligible to vote!"}</h1>
);
const title = response.potentiallyMaliciousInput;

/* This is safe */
const element = <h1>{title}</h1>;
These two below examples are identical:
const element = (
  <h1 className="greeting">
    Hello, world!
  </h1>
);
const element = React.createElement(
  'h1',
  {className: 'greeting'},
  'Hello, world!'
);
React.createElement() performs a few checks to help you write bug-free code but essentially it creates an object like this:
/* Note: this structure is simplified */

const element = {
  type: 'h1',
  props: {
    className: 'greeting',
    children: 'Hello, world!'
  }
};
These objects are called “React elements”. You can think of them as descriptions of what you want to see on the screen. React reads these objects and uses them to construct the DOM and keep it up to date.
Rendering Elements
What is meant by render?
render(), we avoid reloading the whole web page, save time, and increase productivity.What are Element?
const element = <h1>Hello World!</h1>;
Summary:
1. React maintains its own image of what the DOM should look like, called virtual DOM. Calling render method render() updates that image.
2. render() method is called every time React notices changes in component's (or its parent's) state or props. It gives React the most up-to-date information to update virtual DOM. In other words, update its image of what the component needs to look like.
3. Sometimes a small change in a component's state triggers the re-render of all its children components in the component tree. This might seem inefficient, but React elements returned by the render() function are just plain JavaScript objects. Creating and updating them takes very little resources.
4. React rerenders entire component trees to ensure that virtual DOM stays up to date with most recent changes in the app.
5. To reiterate, render() updates virtual DOM, it does not directly update the HTML. React compares virtual DOM with actual HTML, and updates the actual DOM.
Rendering an Element into the DOM
Let's say there is a <div> somewhere in your HTML file:
<div id="root"></div>
We call this a “root” DOM node because everything inside it will be managed by React DOM.
Applications built with just React usually have a single root DOM node. If you are integrating React into an existing app, you may have as many isolated root DOM nodes as you like.
React root node:
root node is a container for content managed by React<div> html element at public/index.html file locationTo render a React element, first pass the DOM element to ReactDOM.createRoot(), then pass the React element to root.render().
It displays Hello World! on the webpage.
const root = ReactDOM.createRoot(document.getElementById('root'));
const element = <h1>Hello World!</h1>;
root.render(element);
React library's main purpose is to render HTML in a web page. React renders HTML to the web page by using a function called createRoot() and its method render() :
createRoot():
- which takes one argument - an HTML element
- defines the HTML element, where a React component (App) should be displayed
render()method of createRoot():
- defines the React component that should be rendered
<div>with theidattribute as "root", in body ofpublic/index.htmlfile, is where, the React application will be rendered
Updating the rendered element
React elements are immutable. Once you create an element, you can't change its children or attributes. An element is like a single frame in a movie: it represents the UI at a certain point in time.
With our knowledge so far, the only way to update the UI is to create a new element, and pass it to root.render().
Consider this ticking clock example. It calls root.render() every second from a setInterval() callback.
const root = ReactDOM.createRoot(document.getElementById('root'));

function displayTime() {
    const element = (
        <div>
            <h1>Hello World!</h1>
            <h2>Current time is {new Date().toLocaleTimeString()}.</h2>
        </div>
    );
    root.render(element);
}

setInterval(displayTime, 1000);
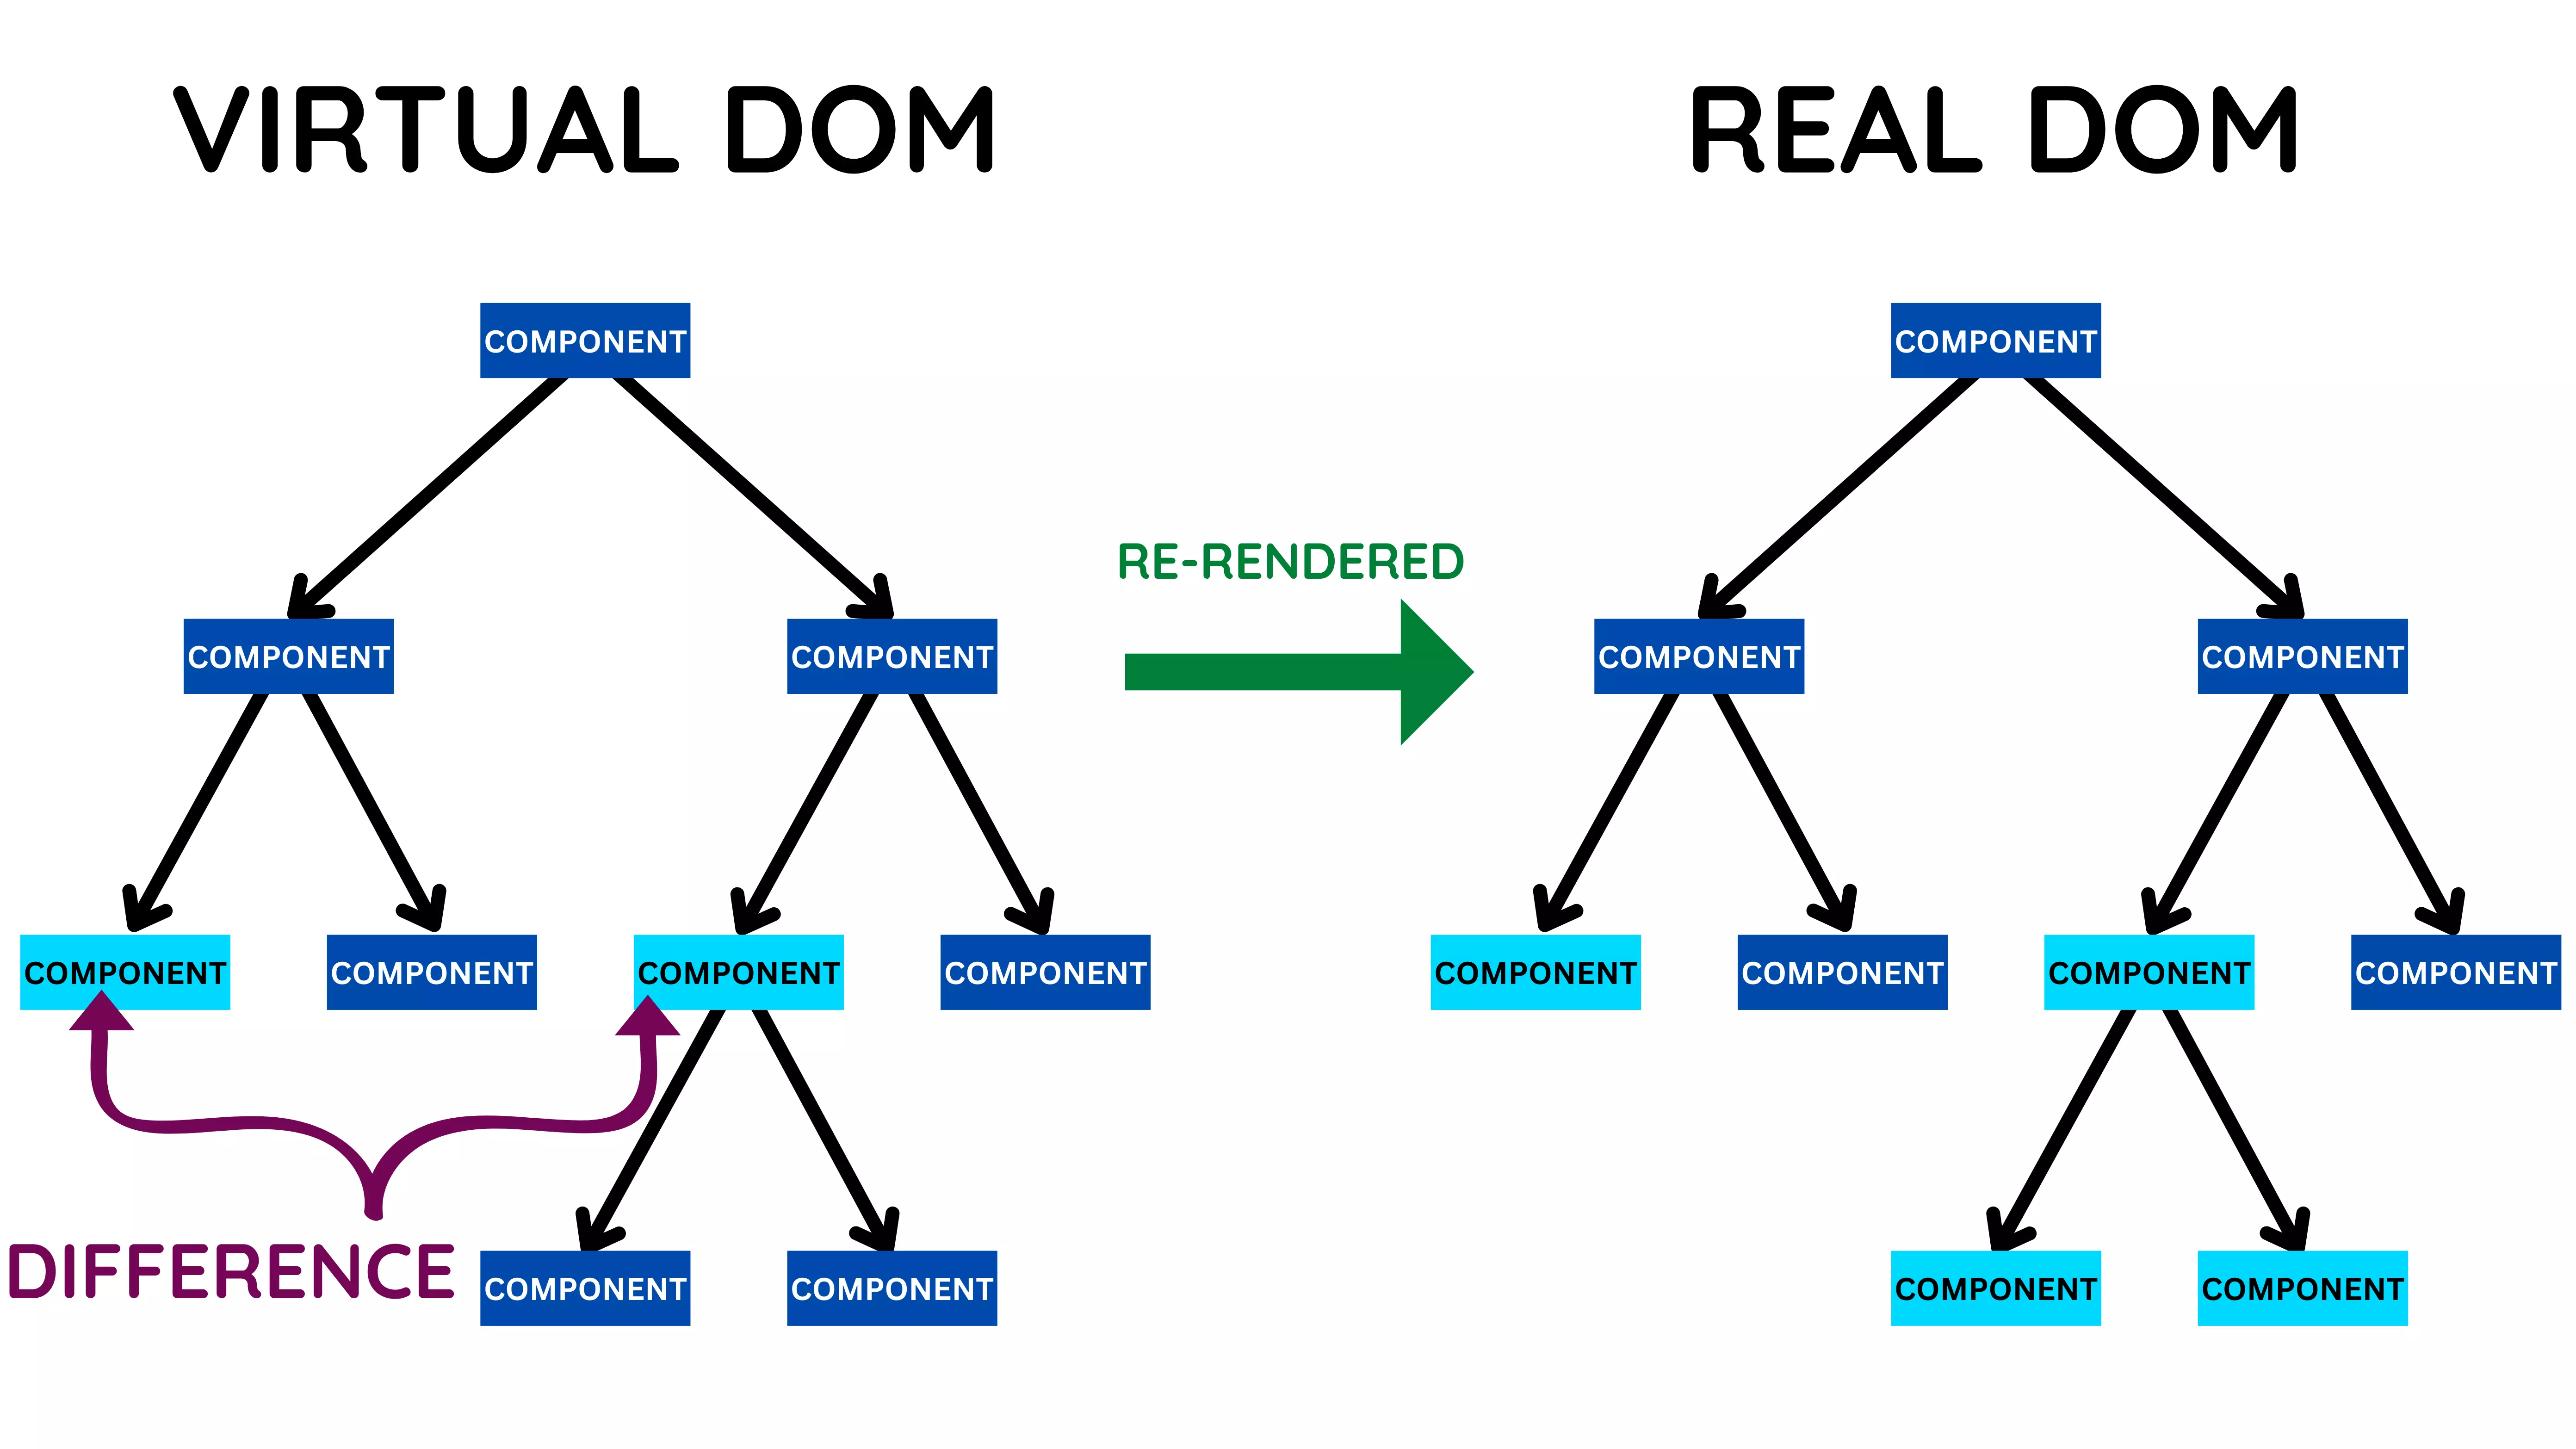
React only updates what's necessary
React DOM compares the element and its children to the previous one, and only applies the DOM updates necessary to bring the DOM to the desired state.
You can verify by inspecting the last example with the browser tools:
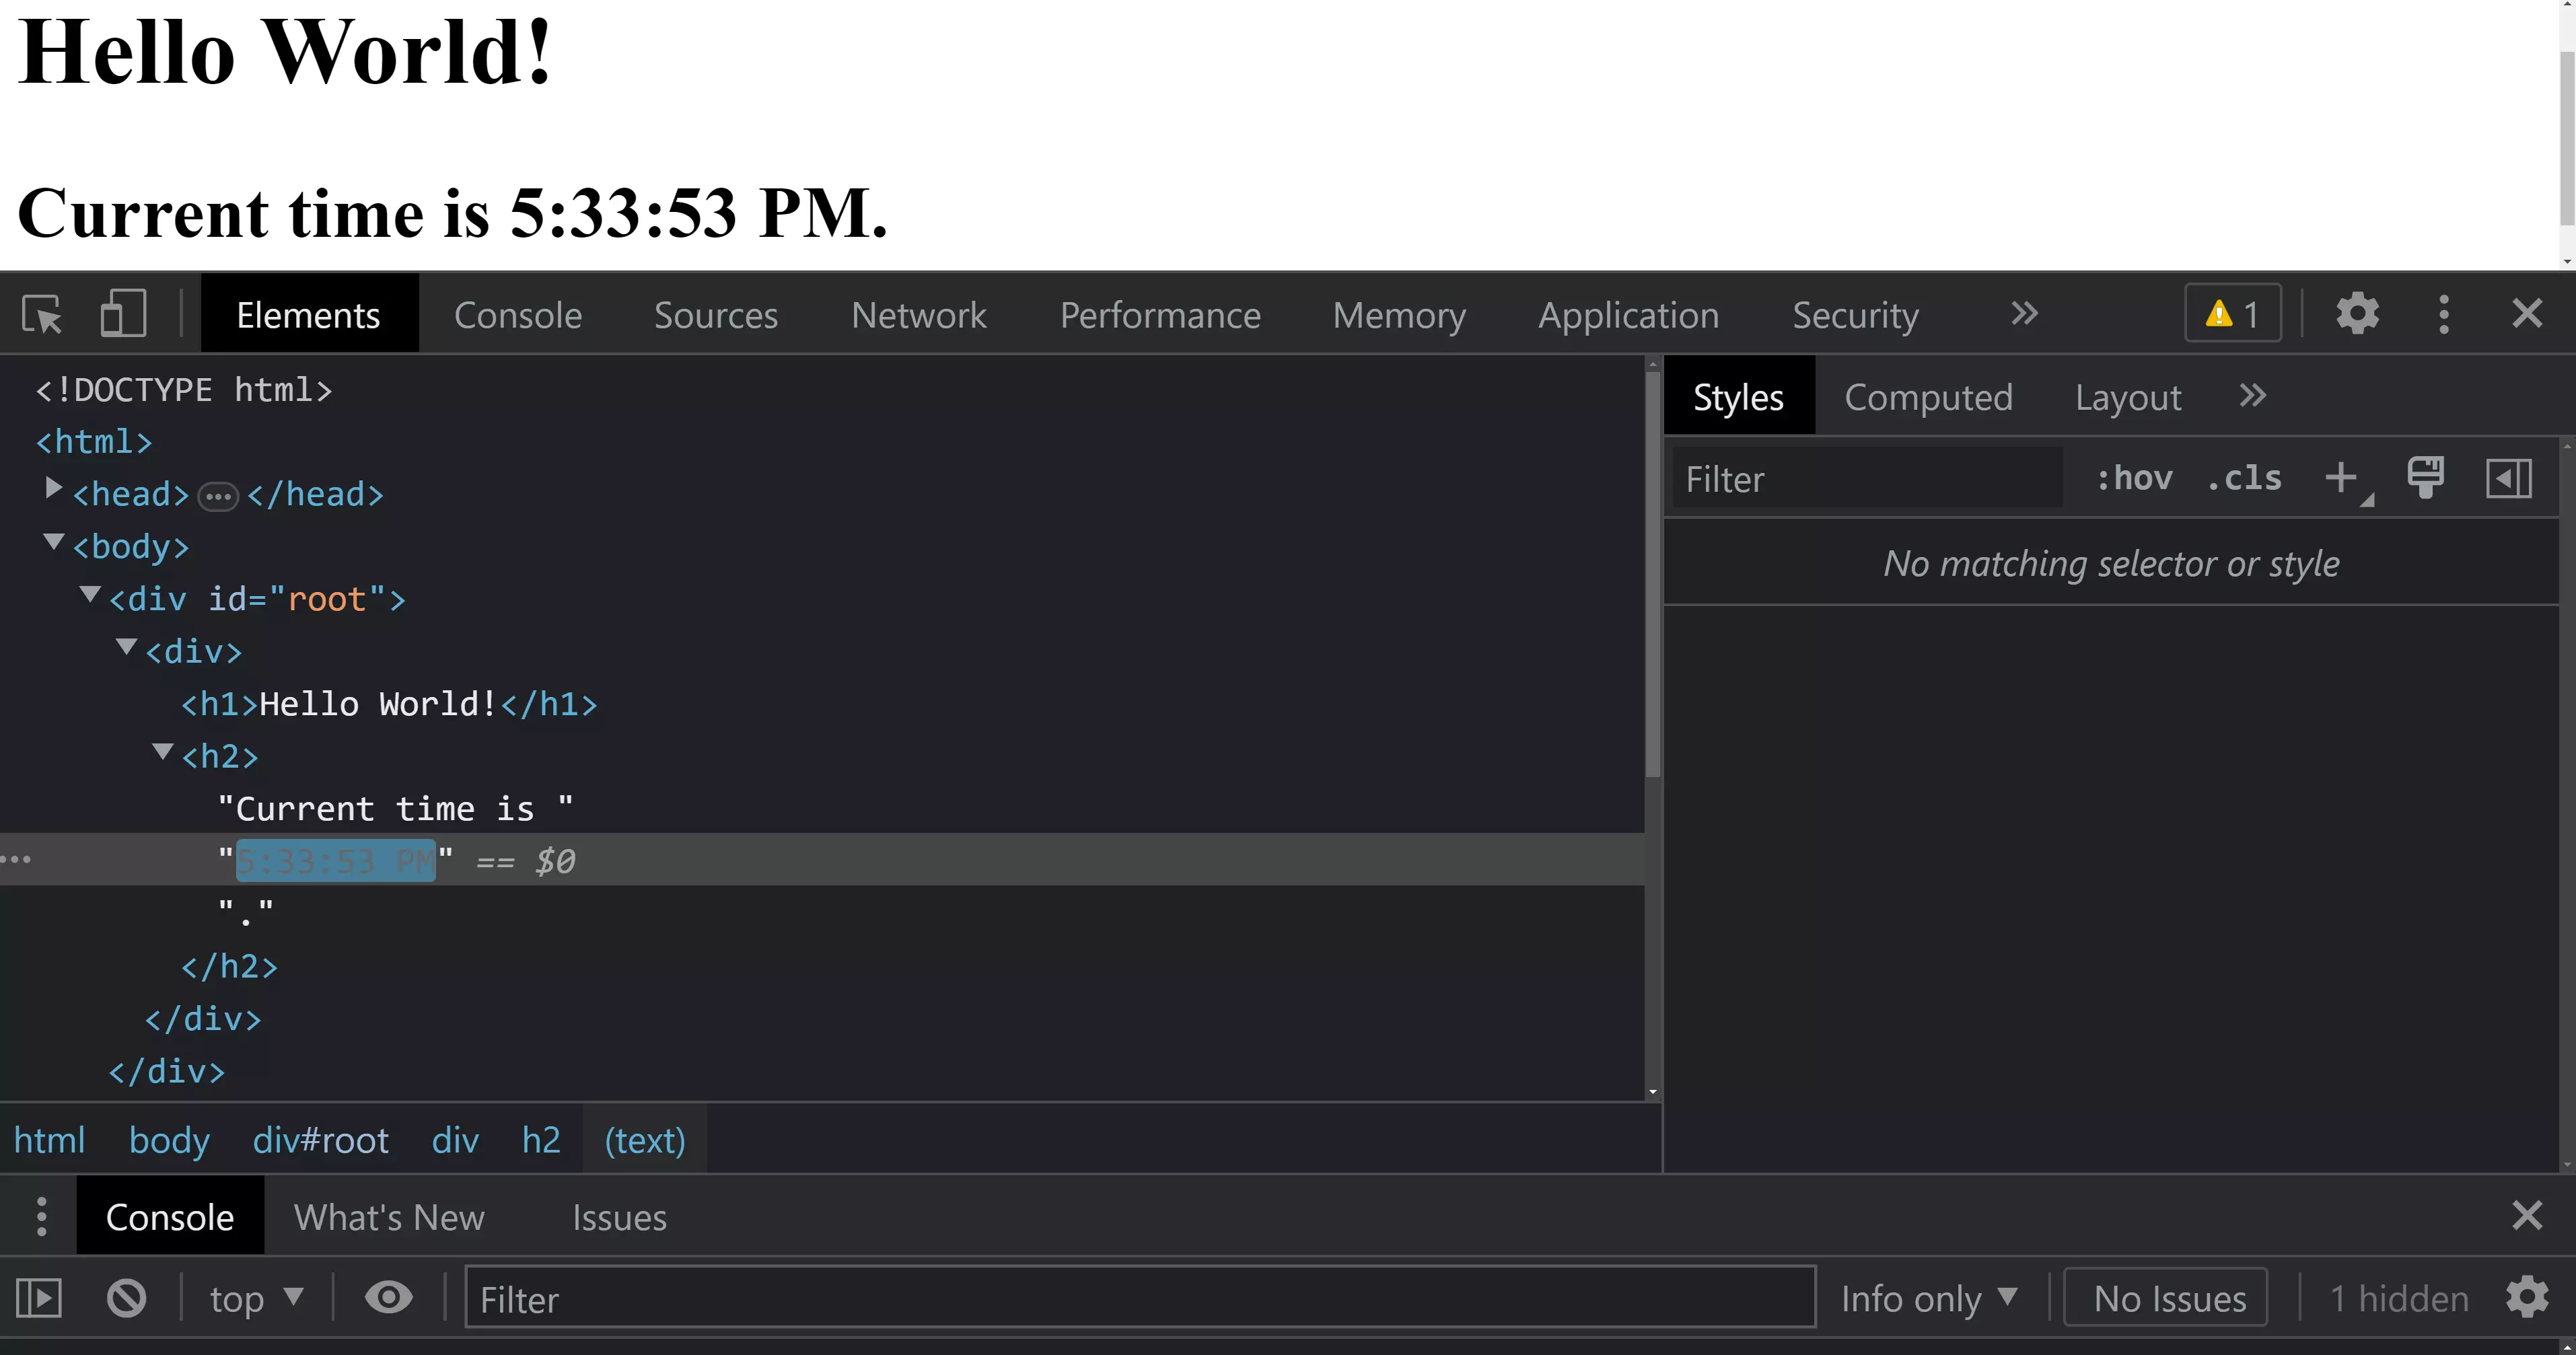
Even though we create an element describing the whole UI tree on every tick, only the text node whose contents have changed gets updated by React DOM.
In our experience, thinking about how the UI should look at any given moment, rather than how to change it over time, eliminates a whole class of bugs.
React Components
React is based on a component-based architecture, which means that the user interface is built by assembling individual components. Each component is responsible for rendering a part of the user interface. When a component is first mounted, React calls its render() method, which returns a React element, a lightweight description of what to render.
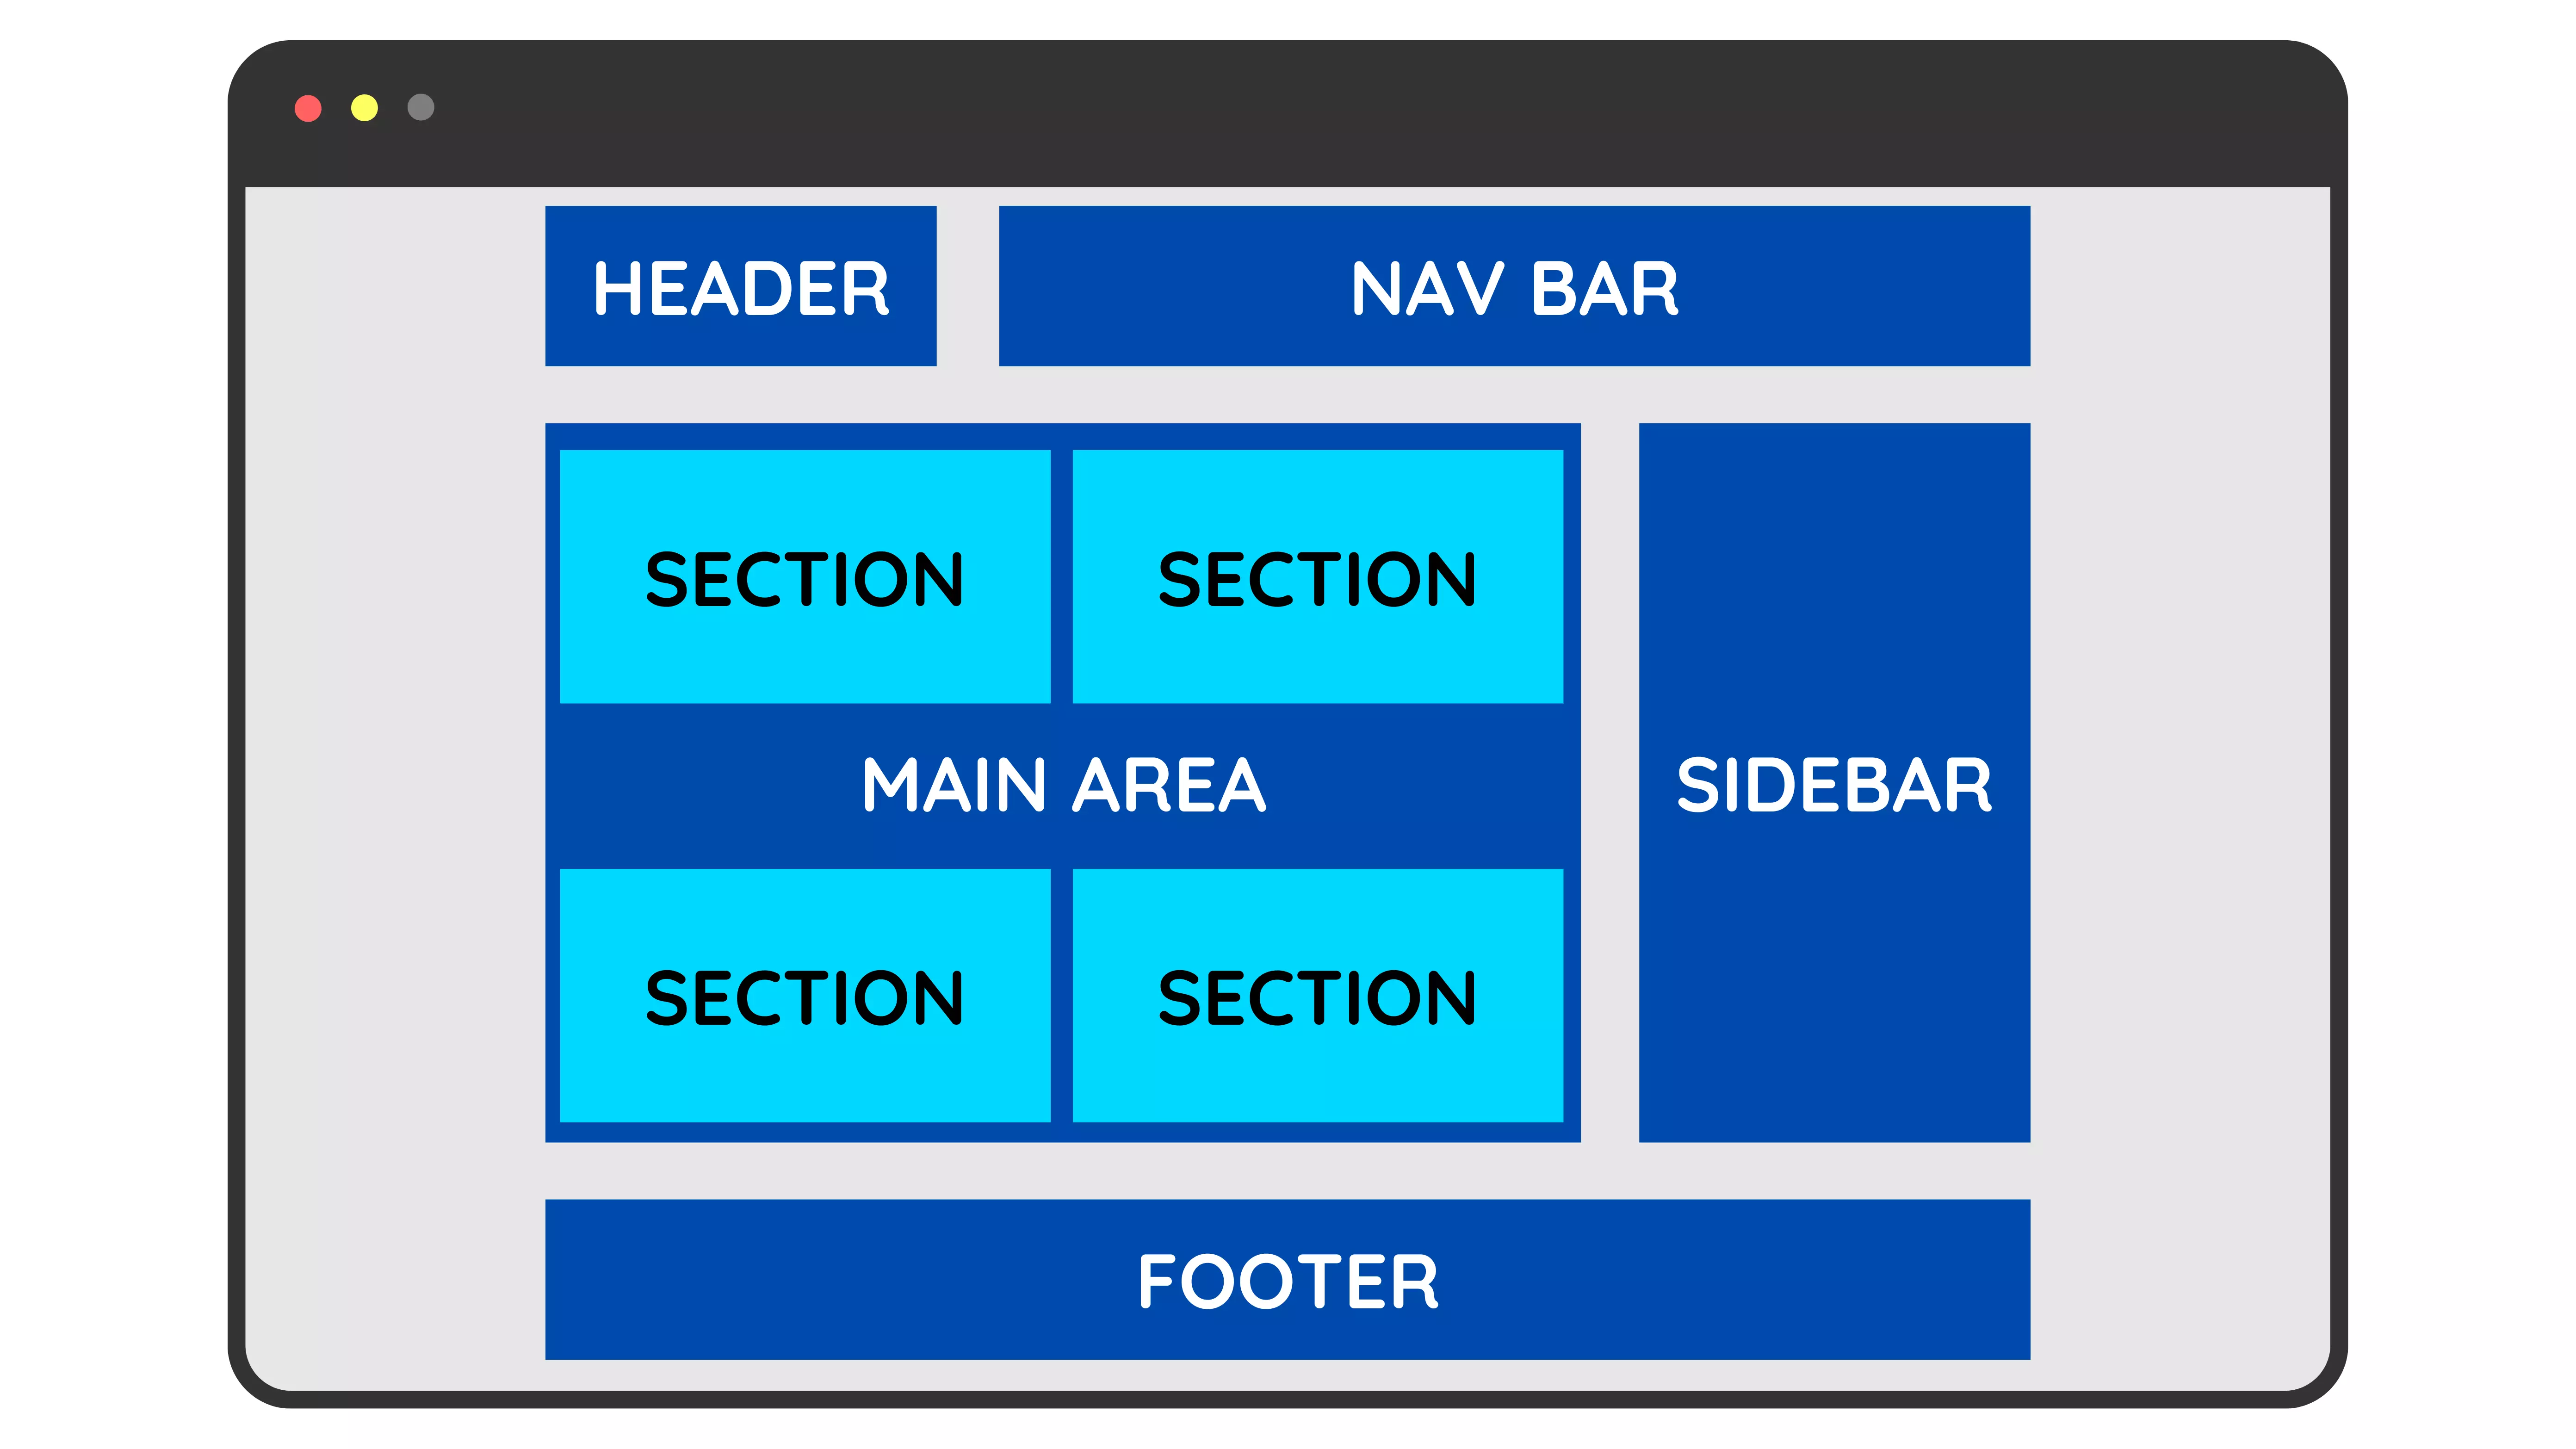
React Components:
The above displayed webpage layout can be represented by these React components:
<PageLayout>

  <PageHeader>
    <HeaderLogo />
    <NavBar />
  </PageHeader>

  <MainPage>
    <SectionOne />
    <SectionTwo />
    <SectionThree />
    <SectionFour />
  </MainPage>

  <Sidebar />
  <PageFooter />

</PageLayout>
Functional Component
/* "App" Functional component that displays a message */

function App() {
  return (
    <div className="App">
      <h1>Hello World!</h1>
    </div>
  );
}

export default App;
Rendering Functional Component
App, which returns a <div> main element<App />
/* React is rendered to a root element in the HTML page */

import React from 'react';
import ReactDOM from 'react-dom/client';
import App from './App';

const root = ReactDOM.createRoot(document.getElementById('root'));
root.render(
  <>
    <App />
  </>
);
Hello World!
- Let's recap what happens in above example:
- 1. We call
root.render()with the<App />element. - 2. React calls the
Appfunctional component. - 3. Our
Appcomponent returns a<h1>Hello World!</h1>element as the result. - 4. React DOM efficiently updates the DOM to match
<h1>Hello World!</h1>.
Nested Components
Here's an example to illustrate nested components:
function Header() {
    return <h2>Header Component</h2>;
}

function Content() {
    return (
        <div>
            <h2>Content Component</h2>
            <p>This is the content area.</p>
        </div>
    );
}

function Footer() {
    return <p>Footer Component</p>;
}

function App() {
    return (
        <div>
            <Header />
            <Content />
            <Footer />
        </div>
    );
}

export default App;
 Header Component
Content Component
This is the content area.
Footer Component
In the example above, the App component serves as the root component, which renders a <div> element containing three nested components: Header, Content, and Footer. Each of these nested components is a separate functional component responsible for rendering a specific part of the UI.
By nesting components, you can break down the UI into smaller, reusable pieces. This promotes a modular approach where each component focuses on a specific task or UI element. The Header component can handle the rendering of the application's header, the Content component can handle the main content area, and the Footer component can handle the rendering of the footer.
Nested components can be used to build more complex UI hierarchies as well. For example, you can have a UserList component that renders individual UserItem components, which in turn may include nested components such as Avatar or UserInfo. This nesting structure allows you to create a rich and interactive user interface.
By composing components in a nested manner, you can achieve code reusability, separation of concerns, and maintainability. Each component can be independently developed, tested, and reused in different parts of your application.
Components in separate Files
You can move a component in three steps:
default or named exports). default or named exports).Here's an example of how React components can be organized in separate files:
1. Header.js:
import React from "react";

function Header() {
    return <h2>Header Component</h2>;
}

export default Header;
2. Content.js:
import React from "react";

function Content() {
    return (
        <div>
            <h2>Content Component</h2>
            <p>This is the content area.</p>
        </div>
    );
}

export default Content;
3. Footer.js:
import React from "react";

function Footer() {
    return <p>Footer Component</p>;
}

export default Footer;
4. App.js:
import React from 'react';
import Header from './Header';
import Content from './Content';
import Footer from './Footer';

function App() {
    return (
        <div>
            <Header />
            <Content />
            <Footer />
        </div>
    );
}

export default App;
In this example, each component is defined in a separate file and exported using the export default syntax. Other components can import them using the import statement and use them within their own code.
The App component serves as the root component and imports the Header, Content, and Footer components. It then uses these components to compose the overall UI structure.
By organizing components in separate files, it becomes easier to locate, understand, and maintain specific parts of the application. This modular approach improves code reusability and allows for better collaboration among team members.
Note that the file structure and naming conventions may vary based on the project's needs and development practices. However, it is generally recommended to keep components in separate files for better organization and readability.
React Props (short for properties)
props objectHere's an example to illustrate the usage of props:
/* child Component - Greeting */
function Greeting(props) {
  return <h1>Hello, {props.name}!</h1>;
}

/* parent Component - App */
function App() {
  return (
    // To send props into a component, use the same syntax as HTML attributes
    <div>
      <Greeting name="Seeta" />
      <Greeting name="Geeta" />
    </div>
  );
}
 Hello, Seeta!
Hello, Geeta!
In the above example, the Greeting component is rendered twice within the App component. The name prop is passed with different values, resulting in two greetings being displayed: "Hello, Seeta!" and "Hello, Geeta!".
React props : Send Data as an object
{ }dot (.) notationHere's a complete example to demonstrate passing props to a child component:
1. Code in ParentComponent.js file
import React from 'react';
import ChildComponent from './ChildComponent';

function ParentComponent() {
  // an object named "info"
  const info = { name: 'Rohit.', age: 25 };
  // define the child component and provide the desired prop(s) as attributes
  return ( <ChildComponent infoAttr = {info} /> );
}

export default ParentComponent;
2. Code in ChildComponent.js file
import React from 'react';

// access the passed props using the props object and dot (.) notation
function ChildComponent(props) {
  return (
    <h1>
      My name is {props.infoAttr.name}. I am {props.infoAttr.age} years old.
    </h1>
  );
}

export default ChildComponent;
My name is Rohit. I am 25 years old.
In the example above, the ParentComponent renders the ChildComponent and passes two props: greeting and age. The ChildComponent receives these props through the props object and renders their values.
Forwarding props with JSX spread syntax ...
Sometimes, passing props gets very repetitive:
function Profile ( { person, size, isSepia, thickBorder } ) {
  return (
    <div className="card">
      <Avatar
        person={person}
        size={size}
        isSepia={isSepia}
        thickBorder={thickBorder}
      />
    </div>
  );
}
Profile does with Avatar. Because they don't use any of their props directly, it can make sense to use a more concise “spread” syntax:
function Profile(props) {
  return (
    <div className="card">
      <Avatar {...props} />
    </div>
  );
}
This forwards all of Profile's props to the Avatar without listing each of their names.
Use spread syntax with restraint. If you're using it in every other component, something is wrong. Often, it indicates that you should split your components and pass children as JSX. More on that next!
React conditional rendering
if statements, &&, and ? : operators.Here are a few common ways to perform conditional rendering in React:
1. if / else statements:
In this example, the isLoggedIn prop is used to conditionally render different content. If isLoggedIn is true, the App component renders a welcome message; otherwise, it renders a message asking the user to log in.
function App ({ isLoggedIn }) {
  if (isLoggedIn) {
    return <p>Welcome, user!</p>;
  }
  else {
    return <p>Please log in to continue.</p>;
  }
}
2. Ternary Operator ? : statements:
Here, the count prop is used in a ternary operator to conditionally render different elements. If count is greater than zero, it renders a paragraph showing the actual count value; otherwise, GetCount component renders a message indicating no count is available.
function GetCount ({ count }) {
  return (
    <div>
      { count > 0 ? <p>Count: {count}</p> : <p>No count available.</p> }
    </div>
  );
}
3. Logical &&Operator:
In this example, the isLoaded prop is used with the logical && operator to conditionally render the paragraph element. If isLoaded is true, the paragraph showing the loaded data is rendered; otherwise, nothing is rendered.
function GetData ({ isLoaded, data }) {
  return (
    <div>
      { isLoaded && <p>Data loaded: {data}</p> }
    </div>
  );
}
4 Using Inline Functions & / or if statements:
Here, an inline function is used to perform the conditional rendering based on the condition prop. The function checks the condition and returns the appropriate content.
function MyComponent ({ condition }) {
  return (
    <div>
      {(() => {
        if (condition) {
          return <p>Condition is true.</p>;
        }
        else {
          return <p>Condition is false.</p>;
        }
      })()}
    </div>
  );
}
Preventing Component from Rendering
In React, you may encounter situations where you want to prevent a component from rendering under certain conditions. There are a few approaches you can take to achieve this.
Conditional Rendering:
You can conditionally render the component based on a specific condition. If the condition is not met, you can choose to render null or an empty fragment (<>...</>) instead of the component. This prevents the component from rendering.
In the below example, if the shouldRender prop is false, the component returns null, and nothing is rendered. If shouldRender is true, the component renders the <p> element with the content. </p>
function MyComponent ({ shouldRender }) {
  if (!shouldRender) {
    return null; // or return <> </>;
  }

  return <p>Rendered content</p>;
}
Component State:
You can use component state to control whether the component should render or not. You can conditionally update the state and trigger a re-render of the component based on specific conditions.
In this below example, the component initially sets shouldRender to false. Using the useEffect hook, you can conditionally update the state based on your condition. If shouldRender is false, the component returns null, preventing the rendering of the content.
import React, { useState, useEffect } from 'react';

function MyComponent() {
  const [shouldRender, setShouldRender] = useState(false);

  useEffect(() => {
    // Conditionally update the state
    if (/* your condition */) {
      setShouldRender(true);
    }
  }, []);

  if (!shouldRender) {
    return null; // or return <></>;
  }

  return <p>Rendered content</p>;
}

export default MyComponent;
React Events
onclick event will be onClick instead { }. Example: onClick = {thankYou} => )Adding event handlers
To add an event handler, you will first define a function and then pass it as a prop to the appropriate JSX tag.
For example, here is a button, You can make it show a message when a user clicks by following these three steps:
handleClick inside your Button component.alert to show the message). onClick = {handleClick} to the <button> JSX. <button onClick={handleClick}>, not <button onClick={handleClick()}>
function Button() {
  function handleClick() {
    alert('You clicked me!');
  }

  return (
    <button onClick = {handleClick}>
      Click me
    </button>
  );
}

export default Button;
You defined the handleClick function and then passed it as a prop to <button>. handleClick is an event handler. Event handler functions:
handle, followed by the name of the event. Passing Arguments
By using an arrow function ( => ), we can pass an argument to an event handler
function ShoppingDone() {
  function thankYou (ty) {
    alert(ty);
  };
// Using an arrow function, passing an argument to event handler
return (
  <button onClick={() => thankYou("Thank you for shopping!")}>
      Thankyou Note
  </button>
);
}

export default ShoppingDone;
Rendering Lists
filter() and map() methods, are used in React to filter and transform your array of data into an array of components.Rendering Multiple Components
filter() or map() methods, to iterate over the data and create a new array of React components or elements. Example: In the below example, the items array contains strings representing fruit names. The map() method is used to create an array of <li> elements, where each fruit name is rendered as a list item.
Keys:
key prop in the <li> elements. It helps React identify each list item uniquely and optimize the rendering process.key is a restricted keyword in React.Where to get your key: Different sources of data provide different sources of keys:
crypto.randomUUID() or a package like uuid when creating items.Rules of keys:
function FavFruits () {
  const items = ['Apple', 'Banana', 'Orange'];

  return (
    <ul>
      {items.map((item, index) => (
        <li key={index}>{item}</li>
      ))}
    </ul>
  );
}

export default FavFruits;
Rendering custom components
Instead of rendering simple elements like <li>, you can also render custom components for each item in the list.
Example: In the below example, the FruitList component renders a list of custom FruitItem components. Each FruitItem component receives the name & id props to display the fruit name & key value.
function FruitItem({ name, id }) {
  return <li>{name} (key value = {id})</li>;
}

function FruitList() {
  const fruits = [
    { id: 1, name: 'Apple' },
    { id: 2, name: 'Banana' },
    { id: 3, name: 'Orange' },
  ];

  return (
    <ul>
      {fruits.map((fruit) => (
        <FruitItem key={fruit.id} name={fruit.name} id={fruit.id}/>
      ))}
    </ul>
  );
}

export default FruitList;
React Forms
Add Forms in React
You can add forms in React app, like adding another other elements.
In the Example below, adding a form which accepts OTP (one time password) number :
export default function ValidateOTP() {
  return (
    <form>
      <label>Enter the OTP:
          <input type="text" />
      </label>
    </form>
  );
}
Handling Forms input & submit
<input>, <textarea>, and <select> are used to capture user input. Each form element typically has a corresponding state in the component to hold the user's input.onChange attribute.useState Hook to keep track of each inputs value and provide a "single source of truth" for the entire application.onSubmit attribute for the <form>Example: In this example, the ValidateOTP component renders a form with one input field for OTP. The state hook otp is used to hold the current values of the input field. The onChange event handler update the state value.
The handleSubmit function is called when the form is submitted i.e. onSubmit = {handleSubmit} .You can process the form data, perform validation, and handle the submission logic within this function.
import { useState } from 'react';

function ValidateOTP() {
  const [otp, setOTP] = useState("");

  const handleSubmit = () => {
    alert('OTP has been validated!')
  }

  return (
    <form  onSubmit = {handleSubmit} >
      <label>Enter the OTP:
        <input
          type="text"
          value={otp}
          onChange={(event) => setOTP(event.target.value)}
        />
      </label>
      <input type="submit" />
    </form>
  )
}

export default ValidateOTP;
Handling multiple Inputs
name attribute to each element.event.target.name and event.target.value syntax.
import { useState } from 'react';
import ReactDOM from 'react-dom/client';

function LoginApp() {
  const [inputs, setInputs] = useState({});

  const handleChange = (event) => {
    const name = event.target.name;
    const value = event.target.value;
    setInputs(values => ({...values, [name]: value}))
  }

  const handleSubmit = () => {
    alert('Login Successful, Welcome back!');
  }

  return (
    <form onSubmit = {handleSubmit} >
      <label>Username:
      <input
        type="text"
        name="username"
        value={inputs.username || ""}
        onChange={handleChange}
      />
      </label>
      <label>Password:
        <input
          type="password"
          name="pass"
          value={inputs.pass || ""}
          onChange={handleChange}
        />
        </label>
        <input type="submit" />
    </form>
  )
}

export default LoginApp;
React Hooks
Characteristics of Hooks
Standard in-built Hooks
React provides a bunch of standard in-built hooks.
useState alternative to help with complex state management.useLayoutEffect fires synchronously.NOTE: If you have stateful logic that needs to be reused in several components, you can build your own custom Hooks.
3 React Hook Rules
React hooks come with three fundamental rules that should be followed to ensure their correct usage:
ReactJS Interview Questions
Get the hold of actual interview questions during job hiring.
What is React?
React is a JavaScript library used for building user interfaces. It allows developers to create reusable UI components and efficiently update the UI based on changes in data.
What are the key features of React?
Some key features of React include virtual DOM for efficient rendering, component-based architecture, declarative syntax, and the ability to create reusable UI components.
What is JSX?
JSX is a syntax extension for JavaScript that allows you to write HTML-like code within your JavaScript files. It is commonly used with React to define the structure and content of components.
What is the difference between a functional component and a class component?
Functional components are simpler and rely on JavaScript functions to define the component. They are used for simpler UI elements. Class components are more feature-rich and use ES6 classes to define the component. They have additional lifecycle methods and state management capabilities.
What is the purpose of state in React?
State is a JavaScript object used to store and manage component-specific data. It allows components to have dynamic behavior and enables them to update and re-render based on changes to the state.
What are React hooks?
React hooks are functions that allow you to use state and other React features in functional components. They were introduced in React 16.8 and provide an alternative to using class components.
What is the significance of the "key" prop in React lists?
The "key" prop is used to provide a unique identifier to each item in a list rendered by React. It helps React efficiently update and reorder the list elements when changes occur, improving performance.
What is the purpose of the componentDidMount lifecycle method?
The componentDidMount method is called after a component has been rendered to the DOM. It is commonly used for tasks such as initializing data, making API calls, or setting up event listeners.
How can you optimize the performance of a React application?
Some performance optimization techniques for React include minimizing unnecessary re-rendering, using memoization techniques like memo and useMemo, code splitting, and lazy loading components.
What is the role of Redux in React?
Redux is a state management library that helps manage the global state of a React application. It provides a centralized store to store application state and allows components to access and update that state.
What are React components?
React components are independent, reusable building blocks that encapsulate the UI logic and can be composed together to build complex user interfaces. Components can be either functional or class-based.
What is the difference between controlled and uncontrolled components in React?
In controlled components, the component's state is controlled by React. The component receives its current value and a callback function to update the value from the parent component. In uncontrolled components, the component maintains its own internal state without relying on React.
What is the purpose of the "setState" method in React?
The "setState" method is used to update the state of a React component. It takes an object or a function as an argument and merges the new state with the existing state, triggering a re-render of the component.
What is the significance of the "useEffect" hook?
The "useEffect" hook is used to perform side effects in functional components. It allows you to run code in response to component mounting, updating, or unmounting. It can be used for tasks such as fetching data, subscribing to events, or manipulating the DOM.
Explain the concept of virtual DOM in React.
The virtual DOM is a lightweight copy of the actual DOM maintained by React. It is a representation of the UI and its state. When there are changes in the data or state, React compares the virtual DOM with the real DOM and efficiently updates only the necessary parts, minimizing performance overhead.
What are React Router and its benefits?
React Router is a popular library used for handling routing in React applications. It allows you to define different routes and map them to specific components. React Router provides a seamless navigation experience within a single-page application (SPA) and enables bookmarking and sharing of specific URLs.
What is prop drilling and how can it be avoided?
Prop drilling refers to the process of passing props through multiple intermediate components that don't need them, just to reach a deeply nested component. It can make the codebase harder to maintain and understand. Prop drilling can be avoided by using techniques like React context or Redux to manage and share state across components.
What is React.memo and when should it be used?
React.memo is a higher-order component (HOC) that memoizes the result of a component rendering. It helps in optimizing performance by preventing unnecessary re-rendering of components. React.memo should be used for functional components that receive the same props and always produce the same result.
Explain the concept of code splitting in React.
Code splitting is a technique used to split the JavaScript bundle generated by Webpack into smaller chunks. This allows for lazy loading of components and resources, loading only the necessary code when needed. It helps in reducing the initial load time and improves the performance of the application.